I was a little neurotic with getting my bathroom to a place where I was ready to share it on my blog. I could have shared it last weekend, since it was mostly finished. Paint, bead board, shelves, hooks, etc. — that was all taken care of … but I hadn’t gotten bath mats! And my shower curtain was still in the mail. And I wanted art!
Finally, almost all of the pieces are together (I still can’t find a nice soap dispenser that matches the chrome in my bathroom. They are all too warm-tones. My chrome is cool toned — like I said, neurotic!) and I can finally share my reno.
OK, back to the beginning. Here’s the bathroom when I started:
There was nothing terribly wrong with it, but I didn’t love the whole look. Our house was a Fannie Mae house and they redid a few rooms, but with not-so-great stuff. The builder-grade vanity and sink weren’t so nice and seemed to clog all the time. The drain wasn’t installed properly and the stopper wouldn’t go up or down.
We’d already replaced the mirror with a surface-mount medicine cabinet, but I quickly grew tired of having the mirror sticking out in my business when I tried to brush my teeth and do my hair.
You can also see the $8 light and us using the top of the cabinet for extra storage. Part of this problem was remedied by us just having less stuff in the bathroom.
Anyway, while a lot of folks would have been fine with the bathroom the way it was, I got tired of the little annoyances and the design, errr, flaws. So I told B that for my birthday I was going to redo the bathroom. That was back in February. I couldn’t decide exactly what I wanted so I put the project on hold for a few months.
When I visited my friend’s new place a month or so ago she had a bathroom similar to what I’d been thinking for ours, inspiring me to revisit the bathroom reno!
OK, so there’s the before and the back story. Now to the project.
I researched what I wanted for weeks before starting this project. And then I stock piled supplies for a few weeks longer once things started coming in. My original idea is nowhere near what I ended up with, but I love the final product.
Let’s start with demo talk! First thing’s first, I needed to remove the tile at the baseboards.
I used a pry bar to take off all of the tile, hammering it behind to get the tile to pop off the wall.
This demo took all of 1o minutes and was so much fun.
Next, I took off the medicine cabinet. Then I promptly hammered a hole into the wall. Muahahaha. It was AWESOME! Brian freaked out about this part, but I reassured him that it would all look nice when I put a new medicine cabinet there.
I finished demo by taking out the vanity, toilet (thanks, Allie!) and other features.
Once I had everything taken apart, I had to put it back together The plan was simple. Bead board. Floating vanity. Tile accents. Thick moldings. Tile insets in the wall. Wall hooks. Industrial vanity lighting. Vessel sink.
Some of that stuff happened! Let’s start with the bead board.
I used PVC bead board, which will hold up to the moisture in the bathroom. Good call.
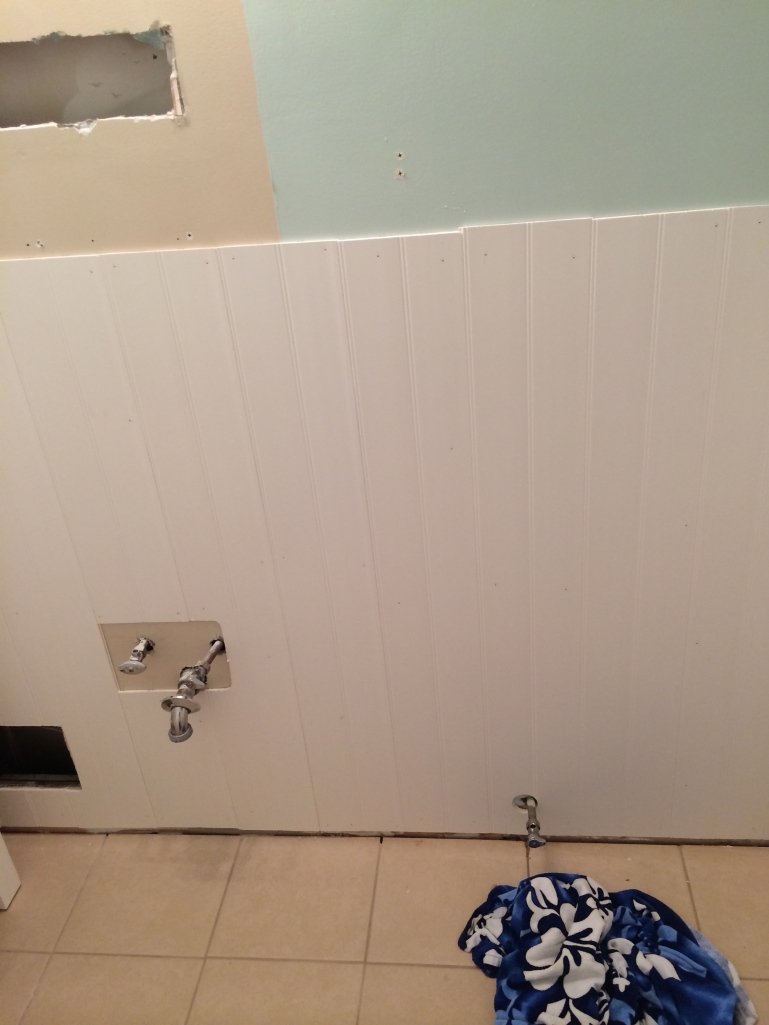
The PVC bead board came with two options: standard plank (three per sheet) or wide plank (two per sheet). I preferred wide plank as a slight twist on the classic. Each sheet was 8 feet long and 7 inches wide. Before I could install the bead board I had to cut all of the sheets in half using a mitre saw.
Once that was complete, and my neighbor came over to help me, we jumped right on installation. It took us about four hours to make it around the whole bathroom. Corners and pipes were slightly tricky, but nothing we couldn’t handle.
I didn’t worry about getting the corners just right because I bought corner trim. You can see the gap in the photo above.
We cut around the pipes behind the vanity, then used a hole saw for the pipe behind the toilet. It worked great. To install the bead board, I used adhesive and my nail gun.
We called it a night with the bead board on the walls.
The next morning, I started installing the baseboards. Allie came over to help me with the chair rail molding, which was wonderful. The baseboards were easy, and I tackled those no problem, but the thicker molding at the top was more of a challenge and I was grateful for Allie’s help.
The trickiest part was around the window. We opted to rip out the bottom of the window sill, cut off the top piece of molding, then install the molding around the window as if it were always like that.
You can see the little gaps that I was later able to fill with caulk.
With all of the moldings up, I caulked the whole bathroom — twice. We installed the chair rail molding on top of the bead board, which left a decent gap from the wall. Because of that, I had to fill in with a lot of caulk. When it dried, it needed a second round. It was amazing was the caulk did to “finish off” the molding.
Up next, paint! The bead board and trim got three coats of white paint.
Then, the hubby and I reinstalled the toilet. And then the sink. Our neighbor Chad helped us a great deal with this since neither of us have any experience with plumbing.
The vanity I bought (not the floating one) had a shelf that (of course) hit right at the pipe coming out of the wall. SOOOOOO, we had to cut up the vanity to make it work.
It’s not pretty, but it got the job done. AND, you can’t see this little jigsaw action until you open the cabinets. There’s plenty of storage on either side, so overall we didn’t lose too much space.
The plumbing with the sink wasn’t a joy ride either. It seems the sink and faucet (not a vessel sink) weren’t the easiest things to install. We got it kind of hooked up a few weeks ago, but the hot water leaked and the center faucet could easily turn (not good, not good). Thankfully plumber Chad came to our rescue again, installing the faucet the proper way last weekend.
OK, so I’m gonna jump around a little in the timeline here since we did parts of the medicine cabinet project early on, and other parts later.
I shared the hole in the wall photo already. After we installed the bead board, but before we added the chair rail molding, Allie and I cut out the hole for the medicine cabinet. This was one of my favorite parts.
I knocked out a bunch of the wall with a hammer first. When I made sure I wasn’t going to totally destroy any wiring by using a saw, I starting cutting along the edges of the 2x4s with a drywall saw. The tricky part, which I didn’t photograph, was there were two 2×4 supports running horizontally in this portion of the wall. We removed both, but then relocated the bottom 2×4 so it could add extra support for the cabinet.
Then, we popped the mirror into the wall — it fit perfectly!
OK, so I said I had to jump around for this part — I partially installed the medicine cabinet when we put up the molding because I wanted it flush with the bottom of the cabinet. Then, I removed the cabinet again and left it out until the room was painted.
Now let’s talk paint. I wanted the bathroom to feel really bright, hence the all-white molding, sink and vanity. I continued this idea with paint choices, opting to go with Breath of Fresh Air from Benjamin Moore. The other thing I did with the paint that I’ve never done before was painting the ceiling the same color as the walls. I absolutely love this choice — it really separated the top of the bathroom from the stark white of the bottom and ended up being one of my favorite design choices in the whole room. You can see the color in the next few photos.
Once the paint was dry, the last thing to do was install the fixtures. I went with chrome for everything, even though the rest of the house is brushed nickel. I added a new toilet paper holder, two hooks for hanging our towels (instead of a towel bar) and a floating glass shelf. I permanently installed the medicine cabinet, too.
Then it was time for the light. The light was tricky for me. You can see in the photo below that the junction box is fairly close to the medicine cabinet hole, which we had to make higher on the wall since the hubster is 6’2″ and would like to be able to see his face in the mirror instead of his chest.
Because of this, finding the light was tricky. On the plus side, the light I ended up going with (not the industrial lighting) ended up being super cheap — $26, plus the globes.
I bought two kinds of globes from Lowes. You can see the large white globes on the fixture and the clear option on the vanity. The white globes were too large, the clear globes were WAYYYYYY too bright. It was blinding in that room.
We ended up with smaller frosted glass globes that we are both really happy with. Brian liked the white color of the first globes. I liked the size of the second globes. The final choice was a happy marriage of the two.
All right…. I’ve given you more pictures of the actual process then you probably ever could have wanted. Time for the reveal!
Ta daaaaaaa! My first renovation where I didn’t have to run to my dad, step dad or family friend/contractor for help. Damn, that feels good 🙂
I am beyond pleased with how the bathroom turned out. And I’m beyond proud of myself for everything that I tackled on my own. I manned the saws and all of the power tools. That list included a compound mitre saw (SO MUCH FUN), a circular saw, a jigsaw, a nail gun, a drywall saw, a pry bar (also so much fun) and a brief stint with the reciprocating saw…. then I decided that was a surefire way to cut through the wall in my other bathroom by accident.
I tackled demo on my own (except the toilet… thanks to my neighbor Allie for being such a good friend and helping me remove our toilet. That’s a real friend, guys.) Using a pry bar was so fun, although quite nerve wracking the first time. I knew I wanted to get rid of the baseboard tile, but I didn’t want to mess up the floor tile. Luckily, it came off without a problem.
I’m also really pumped that B and I reinstalled the toilet ourselves. That involved scraping off an old wax ring, which Brian was SO grossed out by. He went downstairs to get gloves (he grabbed gardening gloves instead of rubber guys…. poor choice) and while he was looking for them I tackled the wax ring issue on my own. Gross, but oddly satisfying.
The design looks on point, for sure. I think the all while bottom, including the sink and vanity, looks really crisp. I chose beige bath mats to blend in with the floors versus having a color pop out on the floor. My only color rebellion is my new garden stool that I rest my hairdryer and brush on when I get ready.
The sink was like my zillionth choice. I wanted a larger, longer vanity to fill all of the space to the left of our vanity (where the garden stool lives). But that would have involved moving plumbing, which would have been much more costly and such a pain. The other issue with that was my bathroom is so narrow that the depth of the vanity (19 inches) didn’t seem to exist with the width I wanted.
That’s when I had the idea to to the floating vanity with a vessel sink. Brian loves vessel sinks, so I thought that would be a nice way to get his taste in the bathroom. That ended up being a logistical nightmare. I wasn’t confident in our ability to support the sink.
So then I toyed with the idea of essentially building an open box with legs as more of a modern look. 1. I’m glad I didn’t do that. Modern is not my style. 2. I wasn’t feeling my wood options at Home Depot or Lowes and was finding it tricky to find other sources for a super small order of lumber. That and I have ZERO experience with building a sturdy piece of furniture. There’s a first time for everything, but maybeeee not when it is attached to plumbing that could rip out of the wall if something went wrong.
My investigation finally led me to the vanity you see. I found it on Amazon, of all places. And that’s where I got the sink (Kohler) and the faucet (Phister). The first vanity came damaged, which actually worked out great because we used it as a test vanity for cutting out the shelf for the pipe. Overall, the vanity I ended up with is very much my style. Had I thought to look on Amazon for a vanity in the first place (versus Home Depot and Lowes), I think this would have been one of my top choices. I wasn’t having the Home Depot or Lowes vanities since they are made of not-so-lovely materials. My vanity is sturdy with soft-close cabinets. Awesome!
The faucet, although a pain to install, is one of my favorite parts. It was expensive and worth every penny. I love the look. I love the feel of the water. I love the chrome. I love it.
And last, but not least… the bead board. Oh how I love my bead board. I love my molding. I don’t miss the tile that I thought about installing between the top of the bead board and the thick molding. It is so classic. It is so clean. I freakin’ adore it. Look for more bead board projects whenever we have a nursery to do. It is happening.
So there you have it folks. Possibly the longest blog post on A Smith of All Trades to date. I am so damn pleased and proud of this bathroom. It was a labor of love during which I proved to myself that I am a bad ass chica who can do construction and not totally botch it up. And, like so many of our other projects, I am reminded of how awesome and helpful our friends are. Without them, I couldn’t have made it through sane.
One last before & after for good measure…
BEFORE:
AFTER:
It is magical.


