Furniture

Console Table Magic

It’s been a couple of weeks since I’ve posted on the blog and I’m happy to share that my tomato tally has crossed the 100 tomato threshold! Yes, this weekend we hit a Tomato Tally of 102. I probably have a dozen more needing to get picked, too. Craziness.

Anyway, this isn’t actually a post about tomatoes. Shocker, I know.

Ever since we rearranged our living room to accommodate my slipper chairs, I’ve wanted to get a console table for our living room.

Slipper chairs

The room is starting to really come together. New chairs, new pillows… and now, new table!

Console before

I found this console table on Craigslist for $25 and an office building 4 minutes from my house. I emailed and was super pleased to hear that I was the first person to reach out and the table was mine if I was interested.

I left work in a hurry to make it to the office complex before they closed at 5, bargained them down to $20 and left with a new table!

The table was wobbly and a bit dated with the gray glass, so I took the glass out and tightened all of the bolts with a ratchet set. Then, I whisked myself off to Home Depot to buy some wood to replace the glass.

IMG_0434

I roped in this kind gentleman to help me cut the wood down to size since we don’t have a table saw (and 51″ is too long to cut even remotely straight with a circular saw). Twenty minutes later, I walked out with two new shelves and some scraps.

IMG_0435

I set up shop on our patio, sanding and staining the wood. I mixed a walnut brown with a light gray stain to lighten the brown color a lot. I ended up with a light brown with hints of gray in the knots of the wood. Two coats of stain, two coats of poly, one light sanding and voila!

Console After

Love love loveeee. It fits perfectly against the wall opposite our bay window where the couch used to sit.

Console In the room

It even matches the style of our coffee table (You can see the style better below when we used them as end tables).

End Table

I waited a day to let everything dry and cure completely before staging it.

Console2

I’m still working on that, but this is stuff I had all around the room just waiting for a home on a nice console table like this one.

Console3I just love having a spot to put out pictures and flowers 🙂

All in all, this project cost a little less than $70 — not too bad for a new console table, especially when it’s twin at Ballard goes for $350!

Next up, a mirror for right above the table, which is centered with our bay window. The mirror will bounce the natural light around the room and really anchor the table with the wall. Now I just gotta find one I like!

Hope you all had a great weekend! Between the console table (I did this whole project in one night after work last week), a BBQ and a river walk, my weekend was a blast.

RemRiv

Rem had a pretty good weekend, too.

Happy Monday!

Craft Projects, Jewelry

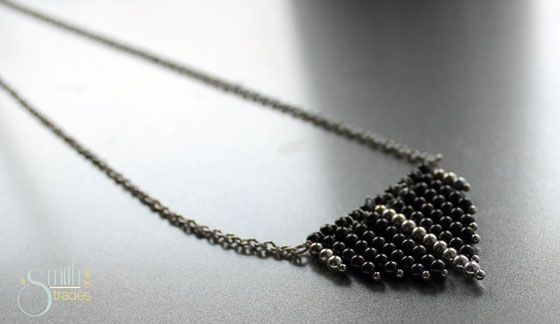
Geometric necklace

Update: I pretty much wear this necklace every day. I love it.IMG_0560

Ever have a project that starts out one way and ends completely differently? I wanted to make a pair of earrings that were inspired by something I saw on Pinterest a week or so ago, so I pulled out my beads and supplies and started fiddling with the beads. The further I got into my project, the more I wanted to create a necklace. I started with one color of bead and a small geometric shape, and I ended up with two tones of gunmetal and a wider pendant.

Onto the tutorial.

{A Smith of All Trades} Geometric Necklace

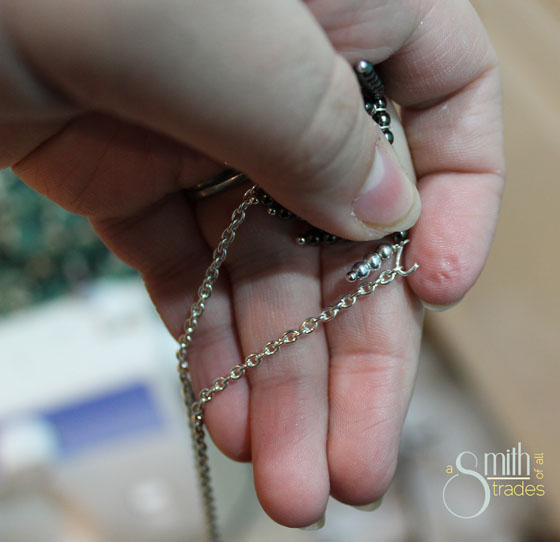
I started this project with one long eye pin, and 11 head pins (eye pins hav a loop at the end so you can connect them to other things; head pins have a flat or round end meant to stop beads from falling off).

{A Smith of All Trades} Geometric Necklace

On each head pin, I placed a specific number of beads. The number was important because it would help make my geometric shape later on. Here’s the pattern I ended up using (it’s not what I started with). 3: silver, 5: gunmetal, 6: gunmetal, 7: gunmetal, 8: gunmetal, 10: silver, 8: gunmetal, 7: gunmetal, 6: gunmetal, 5: gunmetal, 3: silver.

When each head pin had the correct number of beads on it, I twisted the end into a loop to stop beads from falling off the open end.

{A Smith of All Trades} Geometric Necklace

Next, I grabbed my eye pin and started threading the head pins on the order I specified earlier. In between each head pin, I place one gunmetal bead.

One the entire eye pin was threaded with head pins, I closed the other end using round-nosed pliers.

{A Smith of All Trades} Geometric Necklace

Time to add the chain. At first, I added a long chain so this would hang low in my chest. I later went back and added a clasp so it would hit above my chest (I told you I changed my plans a ton!).

To add the chain, I simply cut the amount I wanted, then opened each end of the eye pin and placed a link in the wire. For the clasp, you can attach it in the same way using a jump ring.

{A Smith of All Trades} Geometric Necklace

I really like this necklace a lot. Now that I have a good pattern to follow, I think I’ll try to make it again in funkier colors.

{A Smith of All Trades} Geometric Necklace

Happy St. Patrick’s Day!!

{A Smith of All Trades} Geometric Necklace

Craft Projects, Jewelry, Quick and Easy Crafts

DIY Button Stud Earrings

Button Stud Earrings Cover

I ordered earring stud posts about a month ago and they couldn’t have arrived at a better time. I got home yesterday and found the tiniest package waiting for me on the counter of 50 silver studs — talk about a great way to break me out of my creative rut! I love to make earrings, but I never wear any of what I make because they are all dangle/drop earrings. I am trying to get into the habit of wearing dangle earrings more, especially after receiving a beautiful cobalt blue pair from my neighbors and a mint green pair from my family this past holiday season. But, old habits die hard… or should I say my insecurities die hard. Confession… I am super sensitive about my ear lobes! I have attached ear lobes and think they look funny. My hubby is so sweet and tells me sometimes how nice my lobes are (sounds really weird when I write it on my blog), but I still am not super adventurous in calling attention to my ears with big statement earrings.

Long story short, I really like stud earrings. I think they look a lot better on my ears. Until now, I’d never tried to make them! Last night after an impromptu dinner date with my dad and after watching an episode of Glee (another confession… I love Glee. Don’t judge too much!), I sat down in my craft room and actually crafted! Woot!

Since I’ve never worked with studs before, I made several pairs of super easy earrings using buttons.

For this project I used:

  • Buttons
  • Stud earring backs
  • E6000 glue

Yup, that’s it!

I spent about 20 minutes sorting through my mounds of buttons, hoping to stumble upon two purple buttons that matched. No such luck (which I still cannot believe)! So I pulled out a bunch of other matches that I liked enough to sport on my ears.

button earrings1

Then, I placed a small dab of E6000 onto my workstation (a Neiman Marcus box) and grabbed an old needle to spread the glue with. You could use a toothpick or a rolled up piece of paper. I just grabbed an old needle because I was planning on tossing it anyway.

e6000

Using the needle, I scooped up some glue and carefully spread it on the backing of my stud.

Glue on stud

Then, one by one, I placed an earring stud onto the back of each button.

button earrings2

I let everything dry overnight before adding plastic earring backs to each pair.

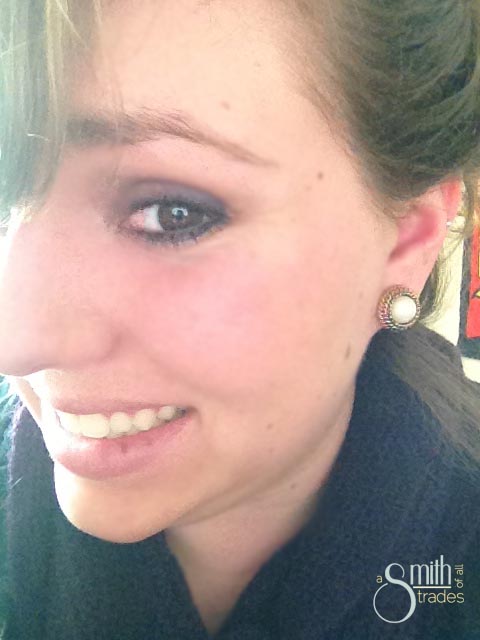
These gold ones are my favorite. The best part is that the buttons are made of plastic, even though they look like metal, so they aren’t heavy on my ears at all.

Gold button earrings

In fact, I wore them to work today (bad photo alert). I look so happy to be wearing them, huh? Haha… I swear I love them even though I look slightly pained in this photo.

Me earrings

Here’s another cute pair… cobalt blue! Love them.

Blue button earrings

I can’t forget about the orange ones I made for Dana. She loves orange and she just got her ears pierced (well… a few years ago). The novelty of making her earrings hasn’t worn off yet.

orange button earrings

I made a black pair, a teal pair and two pairs of super teeny buttons. I love them all. Now, I really need a jewelry box to store them all. Anyone have any recommendations on where to get one? I am super picky and can’t seem to find one I like online.

Hopefully this project was just the start of getting out of my creative rut 🙂