Christmas, Craft Projects, DIY GIFT GUIDE, Gift Idea, Holiday, Wine Crafts

DIY GIFT GUIDE: Eucalyptus Christmas Tree

Eucalyptus Tree Gift Guide

Today I’m sharing a Christmas decoration that would make a great gift. This project was a pain in the butt, but SO worth it. So only make it for someone you really really like :p

Supplies:

  • 1 tree form
  • Eucalyptus (you can grab this from Michaels or any craft store that sells floral stuff)
  • Staples
  • Hot Glue
  • Corks
  • Tacks
  • Ribbon
  • Teal feathers

Steps:

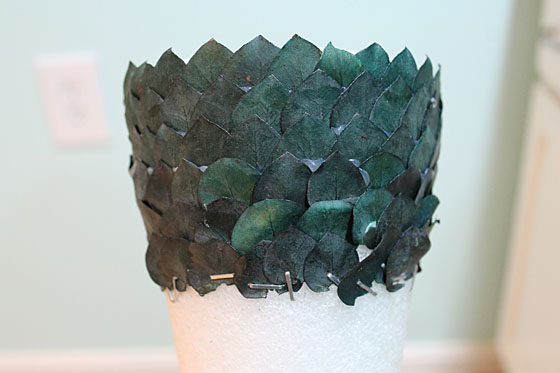
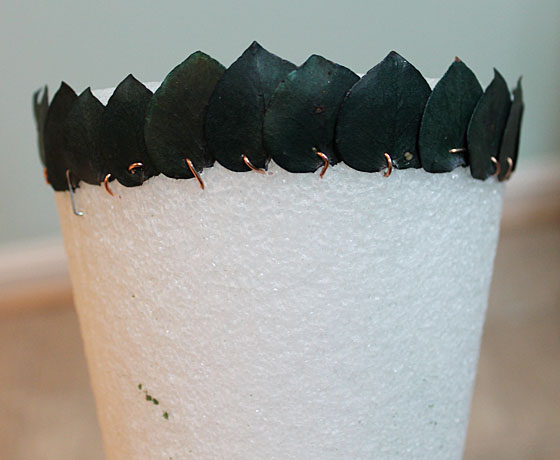
  1. Rip the leaves off of your eucalyptus plant.
  2. Turn your tree base upside down and start to attach the eucalyptus. I did a mixture of staples stuck into the styrofoam, hot glue and some bent wire. Really anything I had at my workbench that would make the leaves stick. Go around and around and around and around until you reach the top.Eucalyptus Tree BaseEucalyptus Tree LeavesEucalyptus Tree Leaves2
  3. Once the leaves are covering the tree, glue corks to the bottom. I chose to place mine at the outer edge of the base of the tree so no white showed. You could place yours in the middle if you wanted it to be more like a real tree.
  4. Fill in any holes/white spots using teal feathers and small dabs of hot glue.
  5. Embellish with silver tacks to look like ornaments. You can use these to strategically pin down any loose leaves, too.
  6. Wrap your ribbon around the top of the tree and secure with glue.
  7. Stick your choice of topper into the top of the tree. I used a flower I had snagged on clearance a while ago. I stuck it into the top of the three using a nail.
  8. Admire your adorable-yet-not-too-Christmasy tree!Eucalyptus TreeEucalyptus Tree2
Christmas, Craft Projects, Holiday, Wreath

Christmas Centerpiece

How many times can I say I have awesome neighbors?

Well, it’s just true and I’m gonna keep shouting that I love them. Because they rock.

Sunday, our neighbor came over to watch football with Brian, so the wives got together and hung out too! But get this, we cleaned! Ye, that is a good friend. Allie and I cleaned the hell out of my craft room, which so desperately
needed it. I threw away a ton of stuff that I wasn’t going to use. I have a pile of crafts to gift this Christmas. And I have a bunch of stuff to donate.

While cleaning, we also found/rediscovered some materials I had bought in the past two years and just never got around to using. For example, a floral ring. Turns out, I had a perfect glass dish (it holds the dip in our now-deceased chip and dip set… thanks, Brian haha) to fit in the center.

So after we cleaned, we headed to Michaels and bought some fake winter foliage to make a Christmas centerpiece.

This project was so easy and would make a great gift. And if you get to Michaels when they are having a sale (50% off of all holiday flowers and an extra 25% off!), it’s not terribly expensive.

I started with the floral ring, and I bought the flowers and the silver charger ($2) at the craft store.

I started by tearing up the floral pieces that I got so each branch, pearl, stem, etc. was separate. Then, I glued the floral ring to the center of the charger.

Starting at the bottom, I started to place large piece of evergreen around the base.

Christmas Centerpiece beginning

And basically, that’s it. No more gluing — just sticking! I worked my way around and around and around. And when I thought I might be done, I wasn’t. So I added more. Once the greenery had good coverage, I added white and silver pearls. These are also available in the floral section and come on wire. So again, just stick ’em where you want ’em.

An important thing to note — I left the center untouched so my dish would still fit in the center. I did place evergreen along the top edge of the center, but nothing in the actual hole in the center. I will be using a fake candle, so I wasn’t too worried about things catching fire.

Christmas Centerpiece

So what do you think!? Isn’t it purdy? I don’t think I would have ever thought to do this if it weren’t for Allie. She was going to make it for me, but she was going to use real plants and that would have kicked it after a season so I opted for fake.

Christmas Centerpiece lit up

She did do another project for my house while I made this centerpiece and hers is even more beautiful.

Centerpiece

I ❤ neighbor craft nights!

What Christmas crafts have you all been up to? I have a lot more things I want to make this year. Here’s hoping I have time!

Furniture

Metalic Pedestal Side Table

I’ve had this beautiful silver tray for more than a year now, holding onto it because I knew eventually I’d come up with something cool for it. Well, I finally was inspired to tackle the tray, turning it into a side table for my navy blue chair.

My coworker and I were rummaging through a local thrift store on our lunch break last week and I found (what Rachel called) a plant stand that would become the perfect base for my table.

IMG_3927

A whole $5 later and I took that puppy home and got to work. First, I had to remove the top of the plant stand. Whoever built this screwed the top in right through the top itself. It didn’t look so hot, but whatevs.

IMG_3928

Once the top was off, I wanted to cut the icky part of the base off of the top. It was covered in an adhesive and was rather gunky.

IMG_3929My hacksaw quickly did the trick.

Next up, drilling through my tray. I used a drill bit that was capable of drilling through metal to put a hole smack dab in the middle of my tray.

IMG_3930

Then using a screw, I secured the tray to the top. In theory, I’ll eventually get a nicer screw for the top that is even less noticeable, but the one I chose you can barely see, so it works for now.

Ta da!

IMG_3933

Except my hubby thought it was really ugly. And the more I looked at it, especially next to the chair, the more I thought it was sorta ugly, too

So then I decided to spray paint the base black. I did the best spray paint job of my life, which involved a TON of patience. A few coats later and a coat of primer and I was almost finished.

One last step — I cut a small circle of thin wood out to sit under the tray so it wouldn’t be flimsy. After painting this black, too, I secured the table back together.

{A Smith of All Trades} Metalic Pedestal Side Table4Much better, huh?

{A Smith of All Trades} Metalic Pedestal Side Table2

It’s the perfect size for a side table, although Brian still hates it so I might relocate this table into our downstairs bathroom to hold a few decorative knickknacks and some hand lotion.

{A Smith of All Trades} Metalic Pedestal Side Table

I think it’s pretty darn cute, though. And for under $10 — heck yes!