Home Improvement, Paint, Uncategorized

Did I mention we redid our kitchen?

My kitchen is never clean enough to photograph. It’s not that we’re gross people, or so I tell myself. But something is always on the counter that shouldn’t be, or there’s a tumbleweed of dog hair on the floor, or we went to bed without loading all of the dishes into the sink. Basically, we’re normal human beings. So it’s taken me FOREVER to make my kitchen photo worthy, even though it’s been complete for at least two months. It was only after I took these photos that I noticed the side and top of the fridge look like the normal hot mess they always are, but screw it. My house never looks perfect, and I think that is just fine for you all to see.

So, here is our finished kitchen!

ASOAT_Kitchen_Complete4

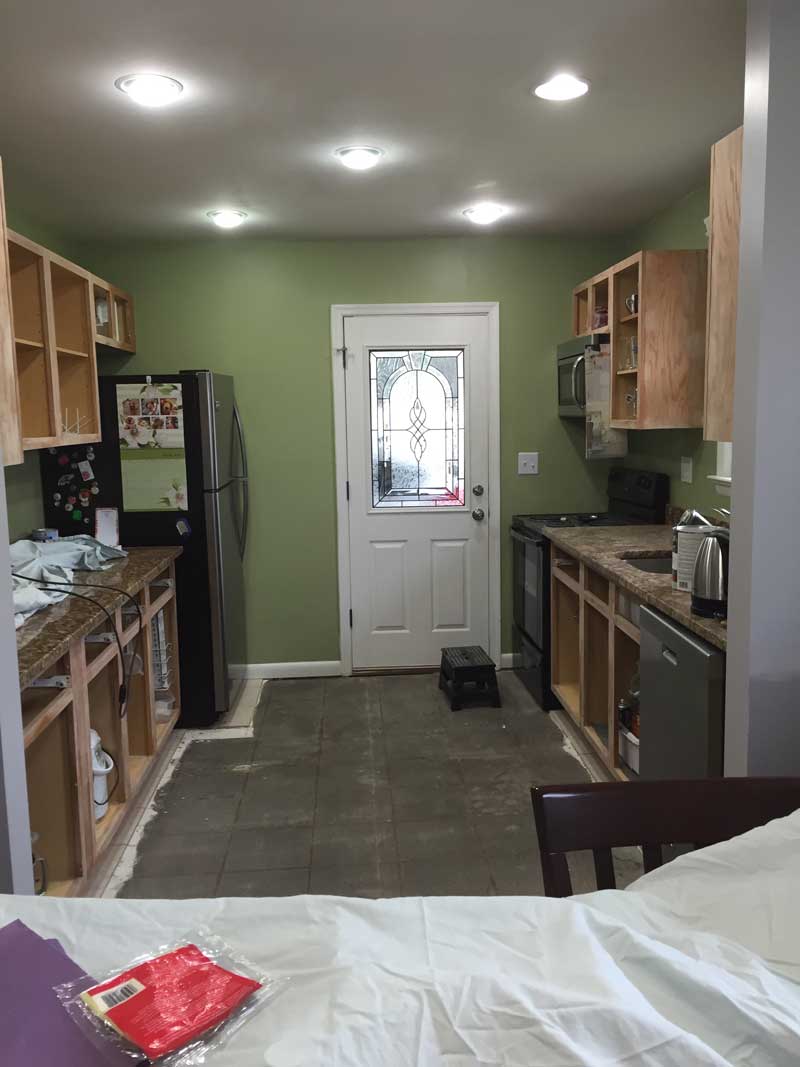
If you’re interested in the whole story, I’ll start from the beginning. Here is the grand before shot (although the wall’s been opened at this point). See, we love us a cluttered fridge!

ASOAT_Kitchen_Before

We did three main things: walls, floors and cabinets.

You already saw in this post that we widened the doorway in our kitchen, removing the door completely and bumping the walls to the edge of the cabinets and to the ceiling. It made our first floor feel a lot more open concept without removing all that much drywall. And the kitchen feels giant now! We are also really enjoying having our table where it was designed to be, in the middle of the dining room rather than up against the wall. It is easier to get around both sides of the table, which is really convenient if we have guests.

Before:

Wall_Before_K

After:

Wall_After_k

We also lightened the wall color, using the same Sea Salt green paint we chose for our bedroom.

The second thing we did was the floors, and all of the kuddos go to Brian. While I was working from home, he removed all of the tile floor, which had been cracking, chipping and losing grout at an alarming pace for years.

ASOAT_Kitchen_Tile-Removal

I HATED the kitchen floors before. They were cheap, ugly and poorly installed. Even the subfloor was a welcome change to the tile.

ASOAT_Kitchen_Tile-Reoved

So when we started talking about redoing the hardwoods throughout the rest of the house, we decided to get a quote for laying hardwoods in the kitchen and feathering them into the existing floors.

ASOAT_Kithcen_Floors-Laid

I am so so happy we did this. It gives the first floor a cohesive look since there isn’t a glaring transition between the kitchen and dining room. And since there isn’t a threshold between the spaces, it makes cleaning the floors a breeze.

ASOAT_Kitchen_Stained-Floors

The last thing we did, which I get to take all of the credit for, was painting the cabinets. I did a lot of research on the best paint to use for kitchen cabinets and settled on Benjamin Moore Advance paint. I’ve used Benjamin Moore Impervo paint on a dresser before, and it’s held up remarkably well. The only blemish is when Brian ran into it on a hoverboard. Womp womp.

The Benjamin Moore store was great. And no, I was not given free paint to say that.  I went in to talk to the people and they recommended I come back and bring in a door and a sample of the backsplash tile we want to eventually install. After seeing the door, they recommended a specific primer based on the type of existing finish. And after much debate and opinions from most of the staff, we ended up choosing Decorator’s White, which I would describe as a pretty pure white. It definitely doesn’t skew warm, which is good because I didn’t want that at all. Once I bought the paint, we got to work taking down and labeling all of the doors.

ASOAT_Kitchen_No-Doors

Then came the “fun” part. I sanded, dusted, deglossed and primed all of the doors and the base cabinets. I also caulked gaps between the base cabinets and walls and filled holes from shoddy installation (thanks, Fannie Mae!).

ASOAT_Kitchen_Doors

Then, I applied three coats to all of the cabinets. This took longer on the doors because of the front and back factor. I wanted to do this right, so I forced myself to take my time and not rush through the painting. It took me about the standard length of a movie to do a coat on the cabinets, so once I figured that out I started enjoying the monotony of painting a bit more.

ASOAT_Kitchen_Doors-painted

And then we waited. We waited for the doors to dry. We waited for the floors to cure. We waited and waited. And once we were satisfied that we wouldn’t muck up all of the hard work we’d done to prepare, we reassembled the cabinets.

ASOAT_Kitchen_PuttingonDoors

The difference was astounding.

ASOAT_Kitchen_complete5

The whole space seems so much larger and brighter!

ASOAT_Kitchen_Complete3

And did I mention I got a fancy glass-top stove! Swoon. Buh-bye coils!

ASOAT_Kitchen_Complete2

The cabinets have held up pretty well so far. I touched up a few spots that got dinged from us putting them back up, and the Benjamin Moore paint is really great for that. Touch-ups don’t stand out as fresh paint. I suspect I’ll have to touch up every now and then, but these cabinets are really and experiment to see how white cabinets hold up in general to kitchen grime. If we ever redo a kitchen in another house down the road, I think I’d definitely choose white cabinets again.

So there you have it, folks. It was a helluva lot of work, but man it was worth it! Our first floor is a brand new space and we love it.

ASOAT_Kitchen_jlovesb

One last time:

Before:

ASOAT_Kitchen_Before

After:

ASOAT_Kitchen_Complete4

Furniture, Interior Decorating, Paint

A temporarily permanent mirror

I’m not a hoarder by any stretch of the imagination, but I have a hard time letting go of items I’m positive I can use someday. And every time I did deep into a pile of long-forgotten gems, I am always so pleased that I didn’t do away with them.

My best friend knows I love mirrors and thrift store finds, so several years ago at Christmas she gave me two beautiful wooden mirrors in major need of some TLC. I have saved these mirrors for easily three years, if not longer.

Traditional Mirror Before

If you are a regular reader of my blog, you’ve seen my console table in my family room that is just begging for a mirror above it. It sits directly across from our bay window, and a mirror would brighten up the space so wonderfully.

Gallry Wall_Living Room

I’ve been searching high and low for a mirror to hang above the console table, checking HomeGoods, Target, Craigslist, thrift stores… the usual spots for inexpensive decor. I was in no rush, so I chose to be super picky (I didn’t want a square mirror and was hoping to find a mirror with a unique, not trendy shape). I’d found a mirror I loved on Craigslist, but it was too pricey. By the time I decided I should just go for it, it was sold. It just wasn’t meant to be.

I was avoiding the pair of mirrors from Dana for many reasons. First of all, they are tall and skinny, and the orientation cannot be changed because of the fancy detail at the top. Plus, I only needed one mirror and didn’t want to split up the pair. And lastly, they were just fancier than I wanted. I don’t think of my house as fancy and really love the relaxed vibe the whole house has, so I didn’t want to throw this traditional mirror in the mix and have it look strange.

I leaned one up against the wall as a test many times and wasn’t crazy about the look, but I bit the bullet and decided to go for an update to the mirrors because they needed it anyway. Who cared if one sat upstairs for a while as the other pined away for its mate in the basement. They are just mirrors, after all.

I sanded down the frame and taped off the edges of the mirrors, then proceeded to paint the whole thing white. I only have transformed one of the mirrors because I wanted to make sure I liked it.

Turns out, I do. And these fancy mirrors don’t look half bad on my console table!

traditional_mirror_white

I titled this post “A temporarily permanent mirror” because I plan on continuing my hunt for a different mirror, either new or used. Regardless of my hunt, I’m so pleased that I like this mirror in my house and over the table — I truly didn’t think I would, but it’s growing on me. I still think it doesn’t have the right proportions for the space, though. Plus, it kills me to separate the pair of mirrors. Now I just need to paint the second mirror white and find a place for the pair. I have a couple of ideas where they might look nice.

These mirrors are super heavy, so if I do choose to leave it, I’ll need to get heavy-duty hanging materials for the wall. I like it leaning, but I think for safety reasons I’d rather it be mounted instead. I’d hate for Remmy to bump the table and for this to fall and hurt him.

Anywho, don’t you just love when someone that’s been sitting in your basement for years turns out to be just what you were looking for, even temporarily? I know I do!

—————————-

UPDATE: I found a mirror I loved at Target, and with that my temporary mirror has been relocated back to the craft room *whomp whompppp*

Here’s the new setup:

Mirror and Console

Home Improvement, Interior Decorating, Paint

So fresh and so clean

Our master bedroom is the perfect display of what it means to be indecisive, something that has plagued me my entire life. Dramatic, yes. True, yes.

I remember waiting in line at the grocery store when I was little and my mom let my sisters and I each choose a candy bar. Well, I couldn’t decide on what to get, so I ended up getting nothing. That’s scarring for a small child, folks. Scarring!

Anyway, back to our bedroom. We wanted to paint most of the rooms in our house before we moved in three years ago (this march, holy smokes!).  I don’t think I’m ever as indecisive in life as when I have to choose a paint color for something. There are sooooo many choices. The master bedroom started off beige, and that was never going to work. The folks who updated our house before we bought it painted everything terrible, boring beige. It all had to go.

First, I bought teal. And I love teal. But it was sooooo bright for a bedroom, so that got nixed before I got farther than a sample coat. I ended up using the color in my craft room, which is in the basement with no windows and needed something super bright and cheery.

Second, gothic amethyst. I should have known from the start that a color with “gothic” in the name wasn’t going to work in my bedroom. It’s a gorgeous purple, and since we are Ravens fans I thought it was a color B could get behind. He liked it. I didn’t. I ended up using the color in my bathroom. I get so many compliments on this color in my bathroom, too! And my stepmom actually just took the remaining paint for the bottom half of her chair rail in my parents’ new house. It looks great, but I’m still glad it isn’t my bedroom color.

That’s the funny thing about me and color. It’s not that I don’t like the colors I choose. I do. It’s just that they don’t seem right for the space.

On to color three: darkish, bluish-gray. Ugh. This was the only color B and I seemed to agree on (he wanted hunter green….) for the bedroom. So I took it as a win that we painted another room in the house a shade of blue and we actually painted the room this time.

A Smith of All Trades_Master Bedroom_bluegray

Well, this should come as no surprise…. I wasn’t ever super happy with this color. It was just. so. dark. and. gloomy. And I’m not a dark and gloomy kind of person. In fact, I’m quite the opposite. I love the brightness of white, but cannot stand the lack of color. So most every room in my house is a light, bright color of some sort.

So yeah, the blue/gray color didn’t work.

A Smith of All Trades_Master Bedroom_bed before

I finally persuaded/annoyed Brian that I’d we’d be happier with a more cheery color, and after years of badgering he acquiesced.

So I wasted no time. I sampled five colors, thinking I wanted a bright neutral. But like I said before, the neutrals lack color (duh) and I seem to always end up not choosing a neutral no matter how hard I try.

So we ended up with Sherwin Williams Sea Salt, a beautiful, super light green that sometimes looks gray.

A Smith of All Trades_Master Bedroom_In Progress

Here’s the room in progress. Don’t you love my style of painting? No tape, no drop cloth, no furniture removed? Hey, it works for me.

The other exciting thing I did in our room while doors were off closets and clothes were out – I painted our closets a bright white. Check this out:

Before

A Smith of All Trades_Master Bedroom_open closet

After

A Smith of All Trades_Master Bedroom_closet after

SO FRESH AND SO CLEAN! Minus the dirt in the corners… I painted the doors, the trim and the insides of both closets white and it made such a world of a difference. The whole space felt bright and airy. And clean. So very clean.

A Smith of All Trades_Master Bedroom_Closet

Once the paint was dry and everything was put back together, I happily shopped at Target for a new duvet cover. I actually ended up keeping the old, dirty-looking duvet we had and simply buying a beautiful knit blanket for the top of the bed. I threw some matching pillows on the pull in the green and blue, added a pop of pink. And voila! Love it.

A Smith of All Trades_Master Bedroom_pillows

The final step that I’ve done so far is to treat myself to a new bed. I looked for months on Craigslist and at Habitat Restore for a bed I liked, but I couldn’t find one. So I bought us a brand new bed online. It is so pretty 🙂

A Smith of All Trades_Bedroom_final1

There is still quite a few things I’d like to do in our room:

  • Iron the curtain I put up for Brian’s closet door. So doable, probably won’t ever happen since I hate ironing. Hey, just keepin’ it real.
  • Get taller night stands for next to the bed. The ones we have a so short it drives me a little nuts. But I haven’t found the right thing yet. Plus, I’d really like to redo these myself.
  • Get B a new dresser. His is old and clunky. And while I actually like the color against the Sea Salt walls, it is time for something a bit larger and more in-line with our style. I’m waiting to find something I can paint in the same color gray as my dresser.
  • Art for behind the bed. I’ve tossed up the idea of doing several gold mirrors or framing some botanical prints. I think this will have a huge visual impact when you walk into the room.
  • New duvet? I still might change up the bedding. I like the knit blanket a lot, but knit doesn’t hold up great. The problem is the dog gets on the bed, so we don’t want to splurge and buy really nice bedding on the off chance it gets dirty. Because it will get dirty.
  • Build a long, skinny console table for under our painting. It is lonely on that wall. Or do something completely different on that wall altogether. Only time will tell.

A Smith of All Trades_Master Bedroom_another view

On the whole, I am loving the update to our room. B doesn’t seem to miss the blue, that’s a win in my book.

A Smith of All Trades_Master Bedroom_final2

P.S. This is actually what our room looks like. Notice the stick of deodorant on B’s nightstand and Remmy’s oh-so-dirty doggy bed. And his sweet stick bone. You can also see the basket by my dresser to hold dirty towels to wipe Rem’s paws. The only thing I changed in here for a nicer photo was not adding our duvet under the blue blanket so it laid flat. Arguably I should have added it since the banket hangs over so long, but whatevs. Perfection is overrated.

Proof: Here is our duvet stuffed nicely into the hamper for this photo shoot hehe. Back on the bed it goes!

A Smith of All Trades_Master Bedroom_hamper shot

Other than that, this is it, baby. Far from perfect. Not even close to matchy matchy. But it’s ours and we love it.

OK, OK…. this is really what it looks like 😉

I couldn’t write a post about our bedroom without including Rem. It is his favorite room in the house, after all.

What do you think? Are you a fan or darker walls or do you like the light and brighter colors?