Furniture

Fixing up a busted dresser

Gosh, it’s been at least a year, if not more, since I fell in love with this antique dresser at a thrift store near my house.

Screen Shot 2016-07-27 at 4.08.20 PM

The zebra(ish) wood was to die for and the price was right, so I scooped it up and let it sit sit sit for a long while. Even though it didn’t work well (broken drawer pulls & drawers that slid too far in or sat unevenly), I still stored lots of goodies in it. Last night, I decided to take advantage of my break from grad school to fix up the piece. I almost died doing it (OK, not really… but take your time with mitre saws, people!).

IMG_1900

The main issue with the dresser was with the top two drawers. Over the years, the center support had fallen out. This caused both drawers to lean into the dresser and into the drawer beneath when pushed all of the way in. You could get them to sit right, but one nudge would send both askew and all of the things you were storing crashing to the back of the drawer.

Nosupport

To fix this, I cut down some scrap wood to fill the gap from the front of the dresser to the back. I screwed in two support blocks, one at the front and one at the back, to nail this makeshift rail into. Then, I glued and nailed a thin piece of wood to act as the rail guide so one drawer couldn’t encroach on the other drawer’s space (my sisters and I could have used something like this in the back seat of mom’s car growing up!)

IMG_1901

I let that dry overnight because I used WAY too much wood glue. This morning I put all of the drawers back and fixed some busted hardware, making for one beautiful, well-working dresser!

IMG_1902

The dresser still isn’t perfect. There are nicks along the edges and a few chips in the top. But it’s GORGEOUS! I can look past the imperfections (OK, I love the imperfections) now that it’s working good as new.

IMG_1904

I mean, just look at those curves! Ow owwww!

The one remaining thing to figure out is if I want to replace the top two drawer pulls. They don’t work the best and only one set had the decorative washers to hid the hardware — if you look close you can see dar circles around the top left drawer pull. Other than that, this dresser is good to go!

Craft Projects, Furniture

Crate table… finally

Remember this crate I bought 50,000 years ago? OK, it was really only 2.5 years ago. But that seems long enough to finish a project, amiright?

{A Smith of All Trades} Sweet wooden crate from Super Flea

I knew I wanted to do something awesome with this crate I found at a flea market in upstate New York, so I bought some hairpin legs and got to work. But my project stalled for, well, 2.5 years — I couldn’t figure out a top for the darn thing! I thought of glass. I tried a cabinet door and a tray. Nothing seemed right.

We were using the crate table as an end table for a while with the cabinet door sitting on top when my sister moved and offered us her end table. Hers was finished, mine was not. It was a no brainer. So I moved my crate table, cabinet door and all, into our basement bathroom. It had an awkward space that needed something, and I was hoping this could be it.

I really liked the way it looked, minus the door, so when we started getting snowed in last weekend and an idea popped into my head I jumped on it.

Here was the plan: I would create brackets within the crate and set a table top inside of it! Brilliant!

So, I screwed cabinet shelf spacers/brackets into the crate so I could slip a table top inside.

ASOAT_Crate-Table_Cabinet-Holder

They aren’t really supposed to go that way — you are supposed to drill holes into the cabinets then screw the brackets into each shelf — but it worked for this project so who cares!

Next up, I took scrap wood and started crafting the table top.

ASOAT_Crate-Table_Scrap-Wood

Before, I was hellbent on having a top that extended over the edges. As an end table, it made a lot of sense. I need a place for coasters and cups, remotes, phones, books — really any crap I need to set on the table while we watch TV and live in our faily room. But in the bathroom, I just needed something pretty with a little storage.

So I started to make a top that would rest inside the crate on the brackets. I measured three pieces of scrap wood, then trimmed them down to fit inside the crate. Once I got everything squared up, I used a nail gun the nail each board onto a board underneath.

Here’s the top:

ASOAT_Crate-Table_Unfinished-Top

And the support underneath:

ASOAT_Crate-Table_TopBottom

The crate is old. Old old old. So I wanted to ding up the top a bit to match. Then, I aded droplets of black stain, and even drew black blotches with my calligraphy pen to date the top a bit more.

Then, I stained the top using a mixture of ebony and walnut Minwax stain. I have no idea what type of wood this is since I purchased it so long ago, but dang — that grain is prettyyyyy!

ASOAT_Crate-Table_Stained-Top

Once the top was dry, I dropped it in to see how it looked.

ASOAT_Crate-Table_Top-CloseUp

… and it looks great! The crate is super cool and it looks awesome in my bathroom.

ASOAT_Crate-Table_Finished

The top easily lifts off by sticking your hands through the handles of the crate, so it is the perfect little storage piece.

ASOAT_Crate-Table_Finished2

Also, can we talk about the hairpin legs? I started this project so long ago I can’t find the pictures of the installation, but it was very easy. Simply screw it into the base of the crate, and voila! I didn’t seal them either, so they look worn, just like the metal on the crate.

On the whole, I love this project. It might have taken me wayyyy too long to finish it, but I am mighty happy with how it turned out.

If you find an old crate — or heck, even a new crate from Michaels — this is a great way to make a storage piece for your home.


Furniture

DIY Poplar Trestle Desk

A couple of months ago I wrote about starting up my Etsy shop. I got great feedback on my designs, and even better advice for opening up a shop. I was inspired to buy myself a large format printer so I can start designing and selling prints on Etsy! Woo!

So I bought my printer, then quickly realized I have no place to set it up. As our office was set up, there was a desk for Brian, then a reading nook for me. I made the (surprisingly hard) decision to sell my comfy red chair and ottoman to make room and fund a desk.

Reading Nook

I had so many ideas when it came to building the desk — so much so that I acted too quickly on one of them.

Let’s start with the top:

At first I wanted to get a butcher block countertop from either Restore or Ikea. My coworker and friend Carrie talked me out of that, encouraging me to instead build the top myself. She let me borrow her Kreg Jig so I could join two pieces of wood to make one nice top.

Once I scrapped the butcher block idea, I went to Home Depot to select wood for the project. I’d used pine before on my console table, so I knew how soft of a wood pine is. Not my best bet for a desk top. I had two additional selections: Poplar and Oak. Oak would have been the best choice, but at $12/foot, so not affordable. I opted to buy 12 feet (cut into two 6-foot pieces) of poplar at $5.XX (can’t remember exactly) per linear foot. Sidenote: Thank goodness for the Home Depot employee and a fellow customer who helped me make the decision to go with poplar. I was heading down a whole other route and they steered me clear or that disaster.

I got the poplar home and broke out the Kreg Jig — take your time and make sure you measure correctly, then have at it. It is a super easy tool to use and I loved it. It’s on my wishlist 🙂 For those who don’t know, the Kreg Jig is a tool that allows you to drill angled pocket holes into wood. For the top, I drilled pocket hole into both pieces of poplar for extra strength. (I swear I took a photo of this, but I cannot find itanywhere. Le sigh.) I clamped the two boards together, then screwed them together using Kreg screws.

Poplar_Unjoined

I ended up with a top for my desk that was sturdy, but needed a lot of sanding. I cut down the ends so the boars were even, then got to work sanding. You can see in the photo in the middle of the two boards where one board was a little bowed compared to the other. I spent hours sanding away to make the whole top flat.

Desk_temporary set up

I finally got the top sanded so the seam was flush. Then I stained it a mixture of black and walnut. I only left the stain on for about 30 seconds because I didn’t want a dark finish on the desk. After that dried, I did three coats of poly.

Check out this color and wood grain. Yowza!

stain

Now for the legs:

Ideally, my desk would have four hairpin legs. And in reality, I’m not convinced I won’t eventually splurge and buy them. Brian hates them, and they are pricey — so that was enough for me to avoid them for now.

I thought instead of hairpin legs I’d buy cabinets for the base of the desk, so I hunted and hunted and found two 30-inch cabinets from Restore. Ugh, best of intentions. They were the right height, but the depth so did not work. I quickly realized this and promptly abandoned ship. Anyone want two old, crappy cabinets that have been rained on a few times? No? Yeah, me either.

Base Cabinet

I cut my losses with that idea pretty quickly, moving on to plan b: Ikea trestle legs.

Desk_temporary set up

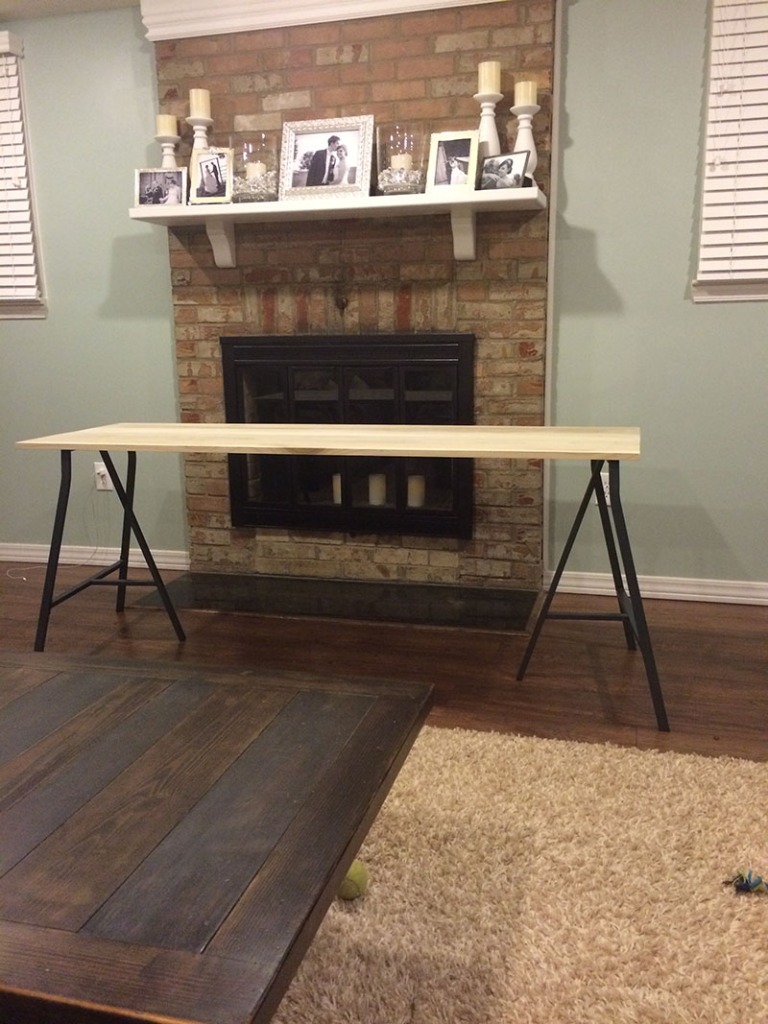
You can see in this image the legs I bought from Ikea. $10 each, $20 total. Not too bad. The downside: They are a little shorter than I’d like, the middle leg kinda gets in the way, they don’t screw into the desk and the color.

Well, I fixed the color pretty quickly, and tried to fix the screwing in issue:

Legs_Before and AFter

Gold legs! Oww owwwww! And some freshly drilled holes in the top bar. For some reason, I still couldn’t get a screw to stay in the poplar from that angle, so they are only screwed in with one screw… total. Haha oh well!

Ready for the reveal?

Desk_Sideview

Check out that pretty desk!

Desk_New1

If you look to the right, you’ll notice a smaller side table with my printer on it! Originally, I thought I’d have the printer on the desk. But it takes up a ton a room (26-inches wide). Plus, with the legs not screwed in I’m wary of having the expensive printer on it (not that I think the desk is about to fall apart). Now I can set up my printer and my shop 🙂

OK, one more view of the desk:

Desk_Side

You can see my turtle print I got at graduation and my Maryland quilt. Go Terps! It’s basically like I’m still on campus when I’m working from home. Except my view from home is sweeter.

I also took my office invasion as an opportunity to purge items from our closet and refresh our bookshelves. Hello, rainbow books 🙂

ShelfThere’s a special place in heaven for husbands who let their wives organize their bookshelves by color. And yes, my Harry Potter books get their own spot on the bottom shelf. Duh.