Craft Projects

Paper flower arrangement

I went to Hobby Lobby to buy one knob and left with my knob and a ton of fake flowers. Hobby Lobby has the best flowers. I especially love their paper flowers, which don’t look real, but also don’t look like they are supposed to be real.

The best part about the flowers was the price! Each sprig was 80¢ on clearance.

Hobby Lobby Flowers

I scooped up all of the clearance flowers to make an arrangement for our family room. I wanted to use the vase that we used as our unity candle for our wedding. It’s been sitting in our guest room with the half-burned floating candle collecting dust. Instead of filling the vase with the glass marbles that often accompany floral arrangements, I decided to use corks. We got married at a winery, so it made sense to use corks with the vase for that reason. Plus, I have so many corks! So, corks were both creative and cost effective!

I tried out my plan before cutting any of the flowers down.

Flowers too tall in vase

Once I decided that I liked the cork and the flowers in the vase, I cut down the stems to fit.

Flowers cut

Then, I started to put everything together in the vase. This was easier said than done because the corks didn’t really want to fall nicely in line. First I tried stacking them so everything was in a vertical line. Five tries later… I gave up on this method.

Corks in vase

I opted to stick the flowers in first, then just toss all of the corks in and let them naturally fall into place. It seemed like the only other method to try, so I just did it over and over again under they fell a way that I liked.

Flowers close up

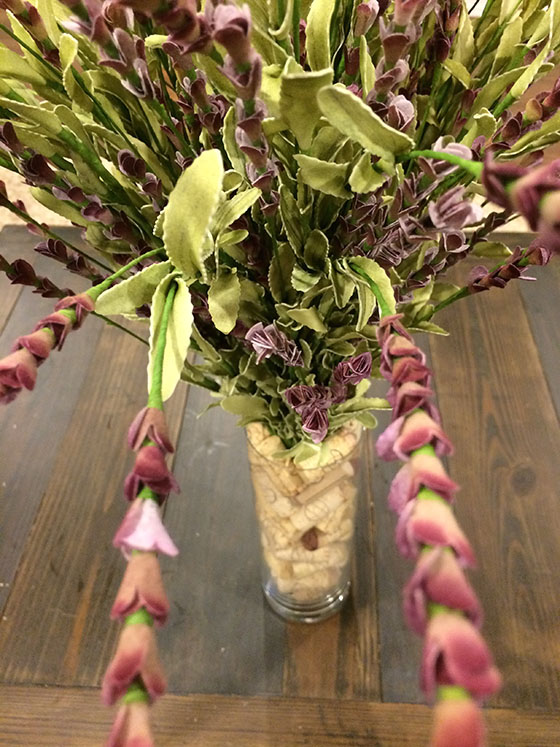
Here’s what I came up with:

Floral Arrangement

This picture took forever to take because someone kept getting in the way….

Rem and flowers

This was after he stole a cork and ran away with it, forcing me to chase him under our kitchen table. The joys of having a mischievous dog. Thanks, Rem.

Anyway… I love how this turned out and that it is secretly sentimental. If you look close you can see the inscription from our wedding. You can also see little specs of the green stem.

Corks

For now, the arrangement is living next to our television. I want to jazz up this space a little bit so it is less black.

Flowers by tv

We’ll see if it drives Brian nuts having a few sprigs in front of the TV.

Flowers

If you see any clearance sprigs at your local HL, pick ’em up! They add such a nice pop of color and a fresh look to a room.

Christmas, Craft Projects, Holiday, Wreath

Christmas Centerpiece

How many times can I say I have awesome neighbors?

Well, it’s just true and I’m gonna keep shouting that I love them. Because they rock.

Sunday, our neighbor came over to watch football with Brian, so the wives got together and hung out too! But get this, we cleaned! Ye, that is a good friend. Allie and I cleaned the hell out of my craft room, which so desperately
needed it. I threw away a ton of stuff that I wasn’t going to use. I have a pile of crafts to gift this Christmas. And I have a bunch of stuff to donate.

While cleaning, we also found/rediscovered some materials I had bought in the past two years and just never got around to using. For example, a floral ring. Turns out, I had a perfect glass dish (it holds the dip in our now-deceased chip and dip set… thanks, Brian haha) to fit in the center.

So after we cleaned, we headed to Michaels and bought some fake winter foliage to make a Christmas centerpiece.

This project was so easy and would make a great gift. And if you get to Michaels when they are having a sale (50% off of all holiday flowers and an extra 25% off!), it’s not terribly expensive.

I started with the floral ring, and I bought the flowers and the silver charger ($2) at the craft store.

I started by tearing up the floral pieces that I got so each branch, pearl, stem, etc. was separate. Then, I glued the floral ring to the center of the charger.

Starting at the bottom, I started to place large piece of evergreen around the base.

Christmas Centerpiece beginning

And basically, that’s it. No more gluing — just sticking! I worked my way around and around and around. And when I thought I might be done, I wasn’t. So I added more. Once the greenery had good coverage, I added white and silver pearls. These are also available in the floral section and come on wire. So again, just stick ’em where you want ’em.

An important thing to note — I left the center untouched so my dish would still fit in the center. I did place evergreen along the top edge of the center, but nothing in the actual hole in the center. I will be using a fake candle, so I wasn’t too worried about things catching fire.

Christmas Centerpiece

So what do you think!? Isn’t it purdy? I don’t think I would have ever thought to do this if it weren’t for Allie. She was going to make it for me, but she was going to use real plants and that would have kicked it after a season so I opted for fake.

Christmas Centerpiece lit up

She did do another project for my house while I made this centerpiece and hers is even more beautiful.

Centerpiece

I ❤ neighbor craft nights!

What Christmas crafts have you all been up to? I have a lot more things I want to make this year. Here’s hoping I have time!

Craft Projects

Mod Podged Candle Holders

Today I’m sharing another project I made for the upcoming Trash to Treasure Fair in November. Using pages from an old book and the remainder of my burlap fabric scraps, I turned two shot glasses that my mother-in-law’s work was going to throw away (not sure why they have shot glasses…) into adorable candle holders.

Here’s what you’ll need:

  • Pages of a book (or any paper) cut into little pieces
  • Mod Podge
  • Fabric
  • Hot Glue
  • Needle and Thread
  • Buttons
  • Ribbon
  • Glass

To start this project, I cut up three or four pages from an old dictionary into little pieces of paper. I had no rhyme or reason for the shape of the paper, just random shapes.

Once my paper was small enough, I started to Mod Podge it to the glass. I put a thick layer of the podge down, then placed strips of paper on top. I smoothed out the paper as I went along to remove any bubbles between the paper and the glass. Once each glass was covered, I placed a layer of podge on top.

I let the candle holders dry for a bit before adding embellishments. They weren’t dry completely, but I didn’t mind since I wanted the stuff I was adding to stick right on top.

At this point, I flipped each glass upside down and added a slim, pink ribbon around the bottom with small dabs of hot glue.

With the pink ribbon added to each glass, I set both candle holders aside to create two oversized flowers. I cut out five petals for each flower, using scraps from an earlier project.

To connect the petals, I folded each petal at the flat edge in an accordion-style fold: down, up, down, up, down.

Then, I sewed through each of the folds. Once I had stitched my way through one petal, I went on to the next, adding petals until I was out.

When all five petals were connected, I looped the needle and thread back through the first petal to finish off the flower.

With the flower complete, I selected a flashy button to add to the middle. I added it to the flower with hot glue, then hot glued each flower to a candle holder.

OHMYGOSHSOCUTE. If these don’t get snatched up at the fair, I might not be so upset.

I like how large the flowers are on the glass, the pink ribbon “leaves,” and the randomness of the dictionary scraps. These might be my favorite candle yet. Now I just need to remake them with aqua ribbon instead of pink ;p