Craft Projects, Thrift Store Finds

Bird Wall Sconce

Holy cow, this was an exhausting weekend. As you may know, our dishwasher has been broken for what seems like ages now. We finally got the go ahead from Samsung to return our dishwasher back to Best Buy, so we went there on Saturday to process a replacement. Turns out our dishwasher is already discontinued — guess everyone else thought it sucked, too — so we had to just return the dishwasher for a refund, wait for that to go through, and buy a new one. *sigh* As if that weren’t a hot enough mess, everything in our house seemed to leak this weekend… pipes, washing machine, sink, etc. Ahhhh the joys of being a homeowner. We are hoping to buy a new dishwasher tomorrow *fingers crossed*!!! I would love to fill the gaping hole underneath our cabinets with a working dishwasher and reattach the pipes underneath our sink. Can’t wait.

Luckily, that was the only bad/stressful part of our weekend. We went to a bonfire and I did lots of crafts. Lots!

On to the crafts!!!

I don’t even remember where I picked up these wall sconces, but they were in need of some l-o-v-e love.

I was originally going to spray paint them, but neglected to do so for real. So, I busted out some of my paint samples and got to painting. I went with a light teal and a light brown.

I took off the candle holder with a screwdriver, then painted the back of the sconce teal and the candle holder brown.

After several coats of each color, I painted the outer trim of the sconce a light brown, too.

Once everything was dry, I pulled out a stencil I’ve been wanting to try. This time, I used stencil adhesive. If you use a stencil, USE STENCIL ADHESIVE. It really does help keep the stencil in place while you paint.

I placed my stencil on the sconce exactly where I wanted it, dabbing on the adhesive around the cutouts right before.

Once the stencil was secure (I only waited about a minute after placing it on), I painted the tree brown, the leaves green and the bird blue.

I pulled off the stencil as soon as I was done painting. Once everything was dry, I screwed the candle holder back onto the sconce.

Now that’s an improvement, wouldn’t you say?

I love it!

I do have a confession, though. It wasn’t until I started writing this post that I remembered I have a second sconce somewhere around my house!! Should I make a second bird sconce since it turned out so well, or should I do something completely different?

I hope you all had a great weekend. And a special thanks to those of you who checked out my blog this past weekend — I had a record number of views on Saturday and was so very excited about it. You guys are awesome and I hope you keep coming back for more!

Craft Projects

Yarn-Wrapped “S”

Good morning and happy Monday!

I showed you yesterday a quick and easy project my girlfriends and I made at our craft night on Saturday. Today, I’m sharing a not so quick and not so easy project that we tackled last weekend, too.

Inspired by many of the yarn- and twine-wrapped letters on Pinterest, Amy, Carrie and I set out to make pretty letters of our own. I made an “S,” Carrie an “H” and Amy a “T.” … we were one letter away from, well, use your imagination.

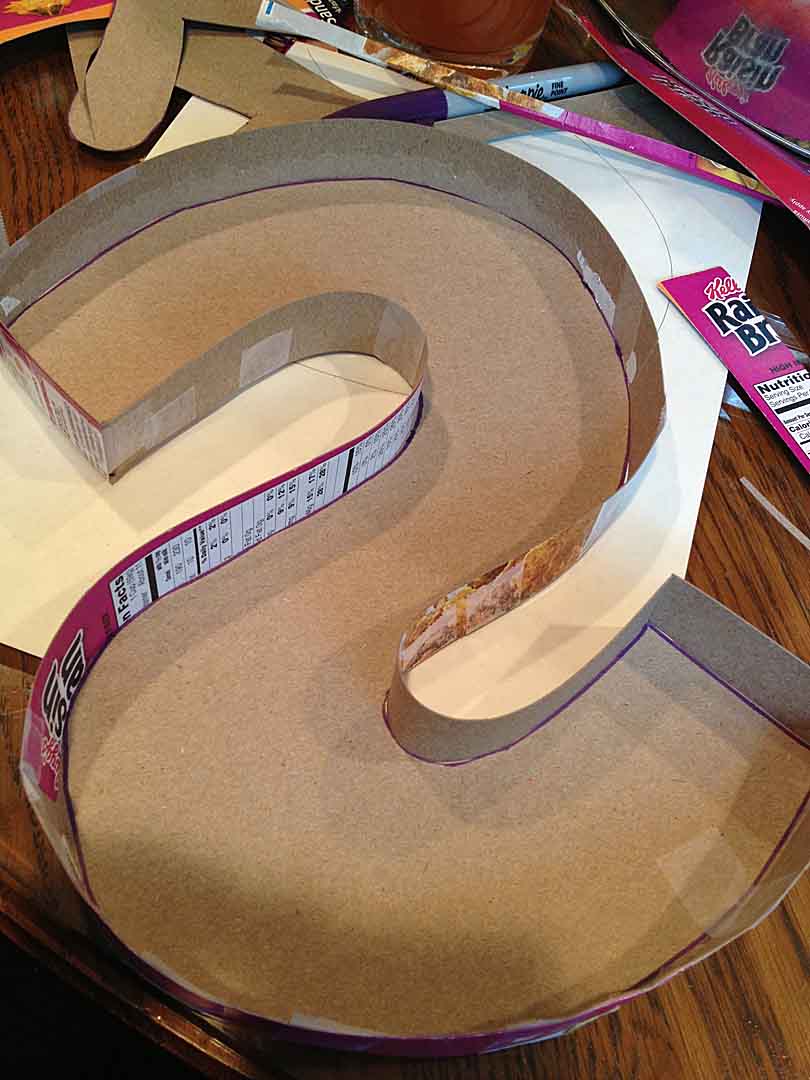
Anyway, instead of buying cardboard letters we chose to make our own to save some mulah. So, we destroyed several of Amy’s cereal boxes (her hubby was wondering why all of their cereal was in bags on the counter) and made letters of our own.

First, we traced letters onto the boxes, then cut out two of each letter.

Next, we cut thin strips of the cereal box and used them to create a 3D letter. We taped the thin strips all around on of the letters, before taping to top letter on top.

Mmmmm… Raisin Bran.

Once our letters were finished,  it was time to add our yarn and twine. I chose to wrap mine in a brown yarn with a little sparkle to it. Amy and Carrie wrapped theirs in twine. To start mine, I taped it onto the back and started wrapping. A couple of pieces of tape in, I realized two things. One: I needed hot glue, and two: I needed something to cover the tips of my “S.”

I cut out two small rectangles of fabric to glue on each tip of the letter, then continued wrapping and gluing yarn around and around and around. I used almost the entire ball of yarn — holy cow.

Hours later (yes, hours), I finally finished wrapping my letter. I think between the cardboard construction and the yarn wrapping, it took me about 2.5 hours.

Looking good, huh? Time to embellish. I whipped up a cute, fabric flower and a couple of leaves to glue to the letter.

Done!

Carrie had to go home before embellishing her flower, but Amy’s “T” got blinged out 🙂

So cute!? Just like her pup, Stover, who kept us company all night.

Once I got home from craft night I showed my finished product to the hubby — he was super impressed. Instead of hanging the letter up on a door or a wall, I put it on a shelf in our family room. It looks like it was meant to be there.

So what do you think? Will you be making a cereal box letter any time soon? I’d do it again!

Furniture

Wooden Trunk (part two)

Whew, this little wooden trunk is taking a lot of prep to get to the fun part. After two coats of Kilz primer (I’m gonna try the spray paint primer next time), I painted the trunk with two coats of Behr gray paint. I used Porpoise, which is the darker shade of gray that I painted below the chair rail in our dining room.

It looks really nice — sorry for the cruddy pictures, it was getting dark!

The inside of this little trunk was also rather nasty, so I painted this gray, too.

I am so excited to get home from work tomorrow so I can do the fun part of this project. I’ll give you a hint– it involves metallic silver paint 🙂 Woo!