Christmas, Craft Projects, Holiday, Life

Hope Ornament: #BloggersforSandyHook

A week ago today, 26 lives were cut short by a senseless act of violence at Sandy Hook Elementary School. Today we blog for Sandy Hook.

As part of the #BloggersforSandyHook tribute I wanted to share an ornament I made for our tree this week.

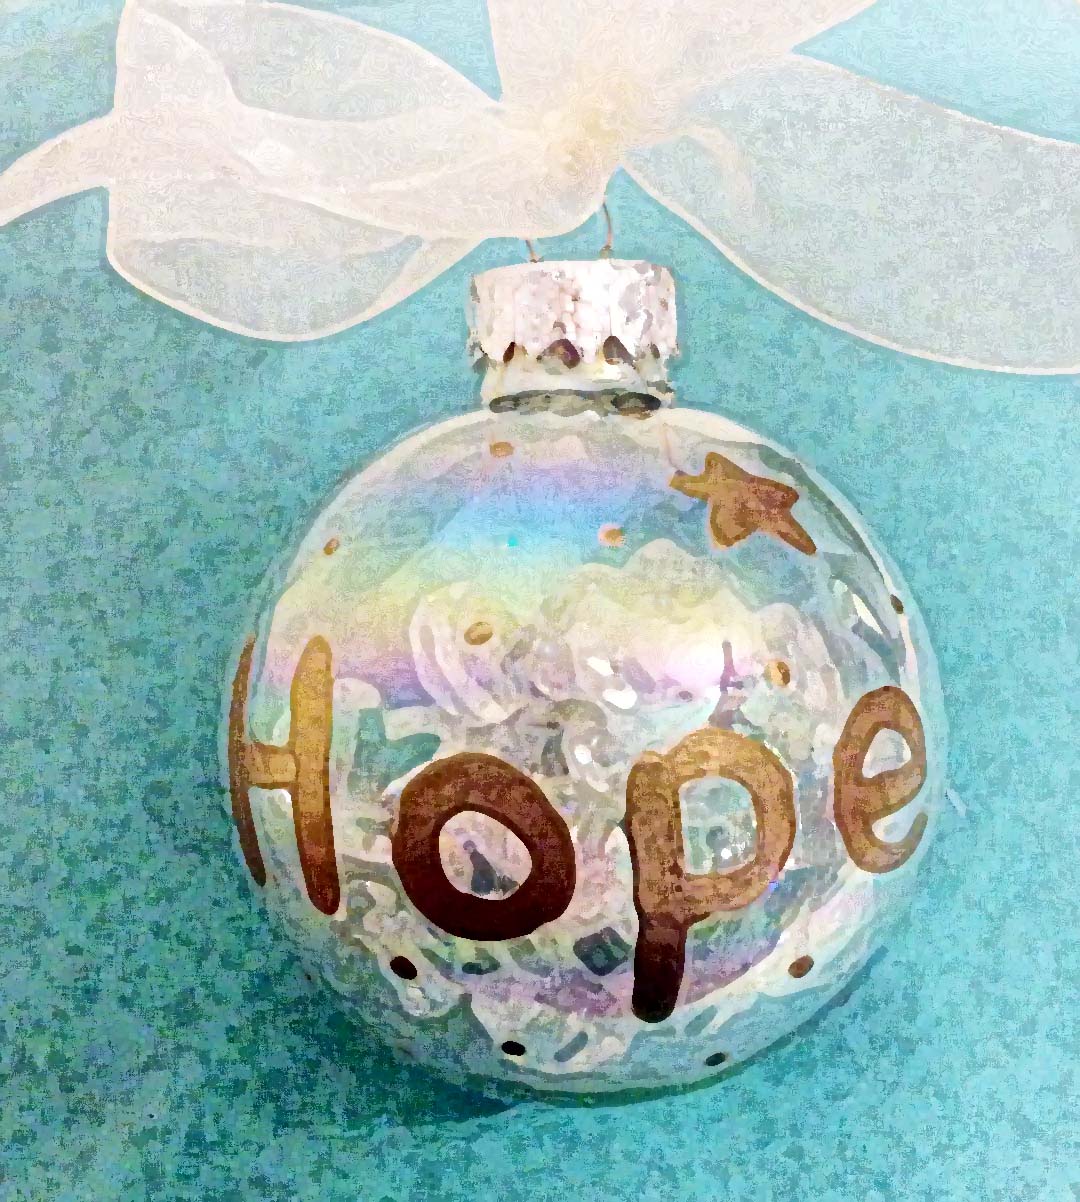
In honor of the grieving community and the 26 people who died at Sandy Hook Elementary School last Friday in Newtown, CT., I made a “hope”ornament for our tree.

IMG_2348

I really like the idea of having this on my tree each year to remind me to hug my loved ones extra tight, especially at Christmas.

If you want to make one too, here is what you’ll need:

  • Gold paint
  • Thin paint brush
  • Crystal beads or gems (26)
  • White ribbon
  • Christmas ball ornament (it can be any color)

Using Martha Stewart gold metallic paint and a thin paint brush, I painted the word “Hope” onto an ordinary glass Christmas ball. I chose to write the word in basic handwriting versus anything fancier — I like that it looks like something a kid could have written, plus I don’t trust my ability to paint in cursive. I then added 26 small dots all around the word “hope” to symbolize those who passed away at Sandy Hook Elementary School. Lastly, I painted one gold star as a tribute the bravery exhibited that day.

After the paint was dry, I carefully went over it all a second time so it really popped on the ornament and on our tree.

Next, I removed the silver top of the ornament and placed 26 crystal beads inside, again, one for each life lost. They are super sparkly and look really pretty inside the ornament. The beads I picked are plastic and sort of chunky, and I’d imagine that little girls would have loved to make necklaces out of them.

As a last step, I put the silver cap back on and tied a white ribbon to the top of the ornament. I added a bow where the ribbon meets the ornament as the final touch.

hope

I was having a heck of a time taking a decent picture of the ornament and didn’t do the best job. It is beautiful and because of all of the gold paint, crystals and white ribbon it looks rather ethereal — which seems very fitting.


To all those grieving in Connecticut: May your lives be filled with hope for a better future and your hearts be filled with the happiest of memories of the loved ones lost. You are in our thoughts this holiday season and inspire us each day to hug our loved ones a little bit tighter. 

I am truly sorry for your loss.

Jess

Christmas, Craft Projects, Holiday

Painted Salt Dough Ornaments

Remember the salt dough ornaments from Sunday? Well, if not, let me refresh your memory.

BAM!

IMG_2205

Carrie, Amy and I made a bunch of these ornaments at our last craft night of 2012 and I hung a few on my tree right away. I also saved a bunch to paint. And, amazingly, I painted all of them on Tuesday night after work! I guess when no television shows are new it’s much easier to motivate yourself to work on crafts.

I broke out my Martha Stewart metallic silver paint that I used like a crazy person this summer (silver mirrors, silver chests, silver everything!) and a teeny tiny paint brush and started to paint different ornaments. I made three snowflakes out of the silver, adding ribbon to hang them on the tree by. I also painted a few with reds and greens. I painted a lot of ornaments last night.

IMG_2328

I accented this snowflake with red dots using the tip of a small nail head.

IMG_2310

Then I painted this little mitten. So cute!

I’d show more, but they are all gifts for people who might be peeking! You get the idea anyway.

One last thing… if the world ends tomorrow, nice knowing ya! 😉 Happy almost Mayan Apocalypse and happy Thursday.

Christmas, Craft Projects, Holiday

Ribbon Ornaments

I’ve been really into making ornaments for our tree lately, and here is one inspired by le pinterest.

I saw an ornament on pinterest that was a Christmas tree made out of ribbon. I ran out of green ribbon after making labels for my applesauce, so my first attempt to make the tree failed miserably because the ribbon was too short. So instead, I made a flouncy ornament out of white ribbon that is pretty just the same.

To start your ornament, find a charm or a bead that you can hand from the end and secure it to a thin piece of wire. You don’t want a wire that is too thick or it will be touch to get it to pass through the ribbon.

IMG_2231

Once you have your bottom charm secured, fold your ribbon into a point and pierce it with the wire. Immediately place a bead onto the wire to hold the ribbon down.

IMG_2232

Then, in alternating lengths, fold the ribbon and pierce through the middle of the fold. Do this a couple of times, and then add a bead.

IMG_2233

Continue until you have a shape you are fond of. If you use green ribbon, you might want to start big on the bottom and get small as you work your way up.

I started with smaller folds, then allowed my folds to get larger in the middle, then small at the top again. I really like the shape it created.

When you are finished with your ornament, fold the ribbon again (so it wont fray) into a point and piece it through the wire on last time. Then make a loop with the wire and wrap it around the base of the loop to tie the whole thing off.

Thread a ribbon or string through your looped wire, and your ornament is ready for the tree.

IMG_1934