Furniture

Crate Coffee Table

Are there any freecyclers out there reading my blog today? I signed up for the local freecycle group more than a year ago and pretty much ignored the onslaught of emails that frequented my inbox until recently. I was clicking through and saw this beautiful antique dresser that I had to have. But of course, since I didn’t pay any attention t the emails and was a week late in asking the person if I could take it off of their hands into my loving home, I missed out on destiny. OK, that is super melodramatic — it would have been awesome to score a free dresser, but it wasn’t the end of the world.

Ever since then, I keep an eye out and quickly scan the emails (I get about 5 a day). I saw a posting for a free crate. No picture, no description other than it was homemade. And I jumped on it.

My loving hubby graciously went along to help me haul the crate into our truck and into our home. I was pretty nervous since there wasn’t a picture, so I wanted him  that the whole thing very well could be a bust.

To my great surprise and pleasure, the crate was awesome. AWESOMEEEEEE.

Crate

It is beat up and well-loved, and once we brought it inside I was totally digging it in our space.

Sure there’s random crate graffiti…

Crate top

… but I kinda like it!

The inside is also way cool…. in fact, I wish they’d used some of the neat inside boards on the outside. But hey, you can’t ask for perfection when you get something for free.

Crate lid

Crate inside

The crate was just sitting on our carpet in front of our couch for a while, waiting for some attention. So I gave it some love by adding casters! And while it wasn’t an earth-shattering change and won’t be the last thing I do to the crate, it made a pretty big difference.

Or at least I think so. … if for no other reason than I can actually move it easily now!

Crate Side

I got the casters from Home Depot and was able to add them with just a few screws each. It took me all of 5 minutes. Gotta love that for a quick transformation.

Crate Coffee Table

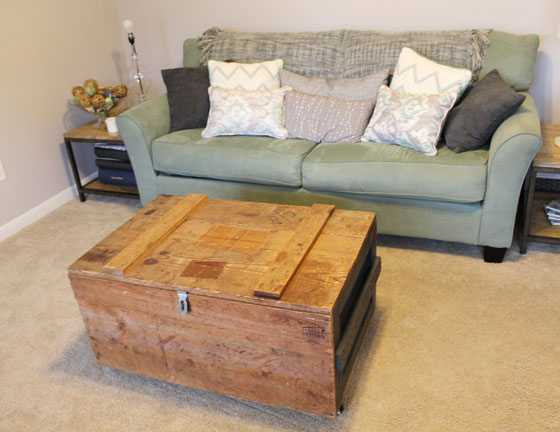
The crate will serve as a lovely coffee table in our family room until I find something a tad bit more permanent. I think it looks really cool near the thrift store end tables that I found not too long ago. The whole room is slowly but surely coming along. Someday I’ll finish it. Maybe.

Scored any free treasures lately?


Craft Projects, Furniture

Metal Chair Redo

metal chair redo

Years ago my momma had a metal chair in her bathroom sitting at her vanity that she decided to trade in for something a little more modern. Even back then I scooped up this treasure with the quickness to refinish and use in my bedroom. The chair was olive green with a camel-colored leather seat. I painted it white and recovered the seat with a thin, blue fabric… and that’s how it has stayed for years and years and years.

chair before

I finally decided I had had enough of this look, mainly the worn-in seat that I covered with quilting fabric versus home decor fabric. Rookie move.

So to start on my redo of a redo, I took the seat off of the chair and started to rip of all of the layers of fabric. First the blue.

chair cushion… then the tan…

IMG_2531

Then Remmy needed to investigate my work.

IMG_2532

To make my chair a little more comfy, I added a layer of batting to the top.

IMG_2533

Then I ironed the fabric for the chair and began to staple it to the cushion.

IMG_2534

Since the seat is round I stapled ever few inches, folding the fabric along the way.

IMG_2536

IMG_2537

IMG_2538

IMG_2535

Then I put it on top of the chair to see how it looked.

IMG_2539

Too similar to before! Time to go big or go home (where I already was… so not sure that works here… but whatevs!) I painted the chair vintage gold.

IMG_2546Time to add the cushion!

IMG_2549

Before and After? Yes, please!

Chair before and after

Craft Projects

Feather headbands

The Trash to Treasure Fair is this upcoming weekend and I am making a few final goodies to bring with me. I had a few feathers left over from my pin and barrette project, so I decided to make feather headbands. They turned out really well and I’m pretty excited about them. They will be a big seller for sure — too bad I only had supplies to make four!

To start out, I grabbed a headband I had sitting around in my craft room, some felt and some cardboard. I trimmed the cardboard and felt down to the same size.

To start, I glued my cardboard onto the headband, holding it at the ends so the hot glue would dry and the cardboard would hold its rounded shape.

When the cardboard was set in place, I hot glued the felt onto to opposite side (the side that touches your hair).

With everything dry and ready to go, I trimmed any excess cardboard and felt. Then, I added the feathers (the best part, duh!). To add the feathers, I put lots of hot glue onto the cardboard and added feathers in rows. I started at the top part of the headband and worked my way down.

Then, I added buttons!

Tah dahhhhh! So pretty!

Here the others I made: