Jewelry

Turquoise necklace and craft night

{A Smith of All Trades} Turquoise Necklace

It had been four months since our last craft night, but last weekend my girlfriends and I finally got together again for some good food, yummy wine, fun crafting and much-needed girl time. We decided to keep it low-key and make jewelry. Since I have more beads than any one human being could possibly ever need or use, I happily hosted.

We made necklaces inspired by a Pinterest find; and although they took a while, they turned out great.

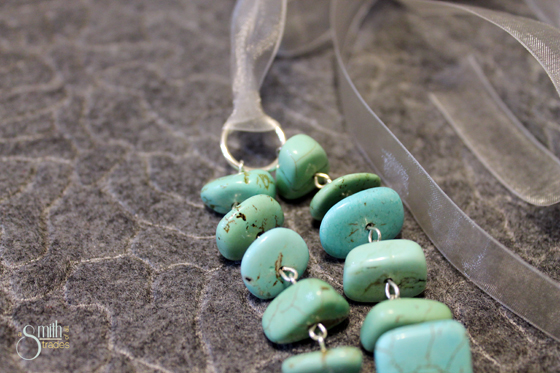
To make your own necklace you’ll need ribbon, two oversized jump rings, beads and eye pins. Simply string an individual bead onto an eye pin, then close the pin at the open end. Loop each new eye pin into the previous one, creating a chain as you go.

Once your chain is long enough, attach each end to an oversized jump rings. Do not connect your jump rings to one another.

If you want your necklace to have multiple chains, which I did, create and attach them to the existing jump rings as before. It helps to make each subsequent chain longer than the first so they hang nicely.

As a last step, add your ribbon. Loop both ends through the jump ring and back through itself on the other side (does that make any sense?).

Voila!

{A Smith of All Trades} Turquoise Necklace

So pretty 🙂

In other news, if you can call it news, I am almost finished reading my Harry Potter books. I flew through the sixth book and am about 200 pages shy of the end of the seventh. They are seriously my favorite books ever and I am already planning on when I should reread the entire series again. The point is, as soon as I’m done reading this book, I’m free! I’ll actually stop being a book worm and do something crafty! Woo!

What do I have in the works?

  • Shutters for the house — purchased, but not installed
  • New lattice enclosure for our garbage cans because ours is hideous and falling apart
  • Ripping up the rocks along our driveway so I can lay weed barrier and make it look less atrocious (Thankfully, my dad already started on this for us.)
  • Maybe doing a weed treatment to our yard because it’s abhorrent… who knows about this though
  • I still want to make an ottoman for our family room, but I need pallets again
Christmas, Craft Projects, Holiday

Christmas Tree craft

IMG_2480

I got the best Christmas present ever when my dad called me on Dec. 23 to ask if I wanted to do a Christmas craft on Christmas Eve morning before all of our festivities began. I said yes (duh) and dad went out hunting for supplies. When he was younger, his mom made Christmas trees out of mixed nuts that she decorated and hung on a wall in their home. He wanted to make one just like it for his home and for mine.

For this project we used:

  • Thin sheets of wood
  • Hot glue
  • Nuts in their shells (three or four bags)
  • Pinecones
  • Metallic spray paint
  • Small ornaments
  • Fabric
  • Batting
  • Drill
  • Jigsaw
  • Wire
  • Felt

Step 1: Bake pinecones to kill any critters that may be living inside. Bake for 25 minutes at 200 degrees. That should do the trick. We gathered ours outside of our gym at 6:30 a.m. … in the dark. I’m sure we looked wayyy creepy.

Step 2: Sketch out a tree shape onto a piece of wood. We drew a triangle for the tree, a small rectangle for the stump and a trapezoid for the base.

Step 3: Cut out your tree using a jigsaw (or a hand saw if you prefer).

IMG_2394

Step 4: If you want to make more than one, use your cutout tree as a stencil and trace it onto the first sheet of wood.

Tree stencil

Step 5: Drill a hole in the top of the tree and string wire through to make it easy to hang later on.

IMG_2398

Step 6: Start gluing on your nuts and pinecones. I used a pine cone for the top of my tree. Dad used a prickly seed from a sweet gum tree as his topper.

IMG_2399

It is OK to have gaps in your nuts and pine cones because you’ll be filling it in with ornaments later on.

IMG_2402

Step 7: Spray paint the top of the tree using a metallic spray paint of your choice. Dad went with a bronze metallic.

IMG_2401

I chose a metallic silver for mine.

IMG_2403

Step 8: Once your tree is painted, it is time to create the trunk. I clipped edged of pinecones and glued them onto the trunk.

IMG_2404

Dad went with thin twigs. If you’d like your trunk to be the same color as your tree, do this step right after gluing on your nuts.

IMG_2405

Step 9: Glue your ornaments onto the tree.

Step 10: Cover the base of the tree in batting. Then, cover with fabric. Our wood wasn’t thick enough for staples, so we hot glued all of our fabric and batting directly to the wood.

IMG_2408

IMG_2407

Step 11: If you see the need, which we did, glue felt to the back of your tree (small circles will do) to spots of the tree that might rub against the door or wall you will hang it on. You don’t want to scuff your walls, and small circles of felt in the corners and around the wire will help.

Step 12: You are done! Hang your tree up for the holiday season and admire.

This was definitely best part of my holiday break, which is saying a lot because I had an amazing holiday break. I loved doing such a fun and sentimental project with my dad. We have one more base for next year. Dad’s got grand plans for how to make our next trees even better.

meanddad

Thanks for the great idea, Dad 🙂 Love you.

IMG_2479

One last thing…. happy birthday to my awesome mother-in-law, Robin!

Christmas, Craft Projects, Holiday, Life

Hope Ornament: #BloggersforSandyHook

A week ago today, 26 lives were cut short by a senseless act of violence at Sandy Hook Elementary School. Today we blog for Sandy Hook.

As part of the #BloggersforSandyHook tribute I wanted to share an ornament I made for our tree this week.

In honor of the grieving community and the 26 people who died at Sandy Hook Elementary School last Friday in Newtown, CT., I made a “hope”ornament for our tree.

IMG_2348

I really like the idea of having this on my tree each year to remind me to hug my loved ones extra tight, especially at Christmas.

If you want to make one too, here is what you’ll need:

  • Gold paint
  • Thin paint brush
  • Crystal beads or gems (26)
  • White ribbon
  • Christmas ball ornament (it can be any color)

Using Martha Stewart gold metallic paint and a thin paint brush, I painted the word “Hope” onto an ordinary glass Christmas ball. I chose to write the word in basic handwriting versus anything fancier — I like that it looks like something a kid could have written, plus I don’t trust my ability to paint in cursive. I then added 26 small dots all around the word “hope” to symbolize those who passed away at Sandy Hook Elementary School. Lastly, I painted one gold star as a tribute the bravery exhibited that day.

After the paint was dry, I carefully went over it all a second time so it really popped on the ornament and on our tree.

Next, I removed the silver top of the ornament and placed 26 crystal beads inside, again, one for each life lost. They are super sparkly and look really pretty inside the ornament. The beads I picked are plastic and sort of chunky, and I’d imagine that little girls would have loved to make necklaces out of them.

As a last step, I put the silver cap back on and tied a white ribbon to the top of the ornament. I added a bow where the ribbon meets the ornament as the final touch.

hope

I was having a heck of a time taking a decent picture of the ornament and didn’t do the best job. It is beautiful and because of all of the gold paint, crystals and white ribbon it looks rather ethereal — which seems very fitting.


To all those grieving in Connecticut: May your lives be filled with hope for a better future and your hearts be filled with the happiest of memories of the loved ones lost. You are in our thoughts this holiday season and inspire us each day to hug our loved ones a little bit tighter. 

I am truly sorry for your loss.

Jess