

I got the best Christmas present ever when my dad called me on Dec. 23 to ask if I wanted to do a Christmas craft on Christmas Eve morning before all of our festivities began. I said yes (duh) and dad went out hunting for supplies. When he was younger, his mom made Christmas trees out of mixed nuts that she decorated and hung on a wall in their home. He wanted to make one just like it for his home and for mine.
For this project we used:
- Thin sheets of wood
- Hot glue
- Nuts in their shells (three or four bags)
- Pinecones
- Metallic spray paint
- Small ornaments
- Fabric
- Batting
- Drill
- Jigsaw
- Wire
- Felt
Step 1: Bake pinecones to kill any critters that may be living inside. Bake for 25 minutes at 200 degrees. That should do the trick. We gathered ours outside of our gym at 6:30 a.m. … in the dark. I’m sure we looked wayyy creepy.
Step 2: Sketch out a tree shape onto a piece of wood. We drew a triangle for the tree, a small rectangle for the stump and a trapezoid for the base.
Step 3: Cut out your tree using a jigsaw (or a hand saw if you prefer).

Step 4: If you want to make more than one, use your cutout tree as a stencil and trace it onto the first sheet of wood.

Step 5: Drill a hole in the top of the tree and string wire through to make it easy to hang later on.

Step 6: Start gluing on your nuts and pinecones. I used a pine cone for the top of my tree. Dad used a prickly seed from a sweet gum tree as his topper.

It is OK to have gaps in your nuts and pine cones because you’ll be filling it in with ornaments later on.

Step 7: Spray paint the top of the tree using a metallic spray paint of your choice. Dad went with a bronze metallic.
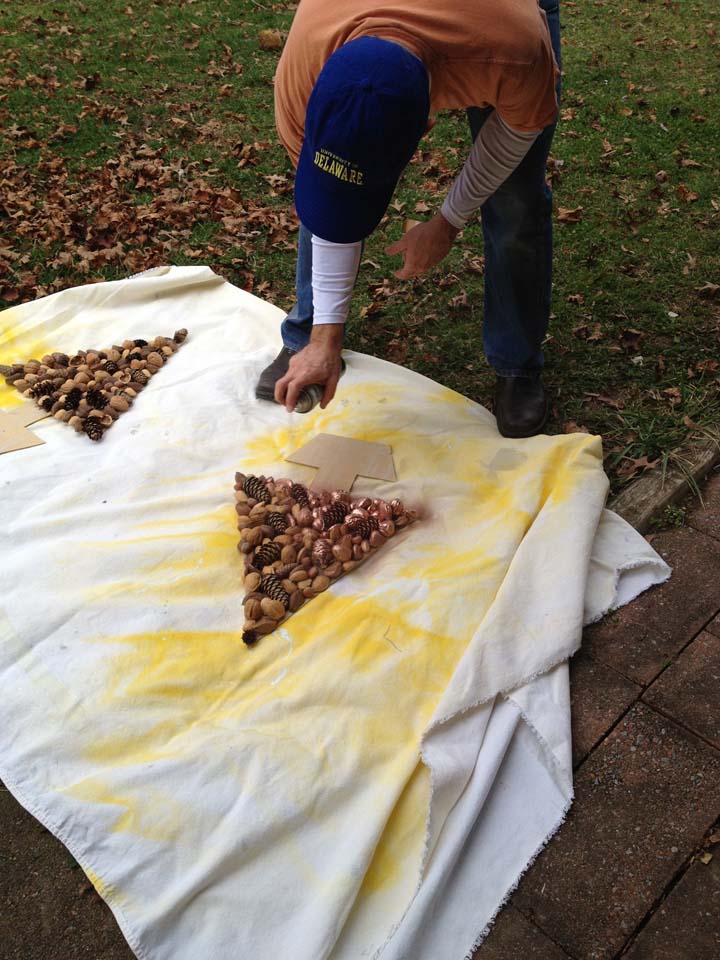
I chose a metallic silver for mine.

Step 8: Once your tree is painted, it is time to create the trunk. I clipped edged of pinecones and glued them onto the trunk.

Dad went with thin twigs. If you’d like your trunk to be the same color as your tree, do this step right after gluing on your nuts.

Step 9: Glue your ornaments onto the tree.
Step 10: Cover the base of the tree in batting. Then, cover with fabric. Our wood wasn’t thick enough for staples, so we hot glued all of our fabric and batting directly to the wood.
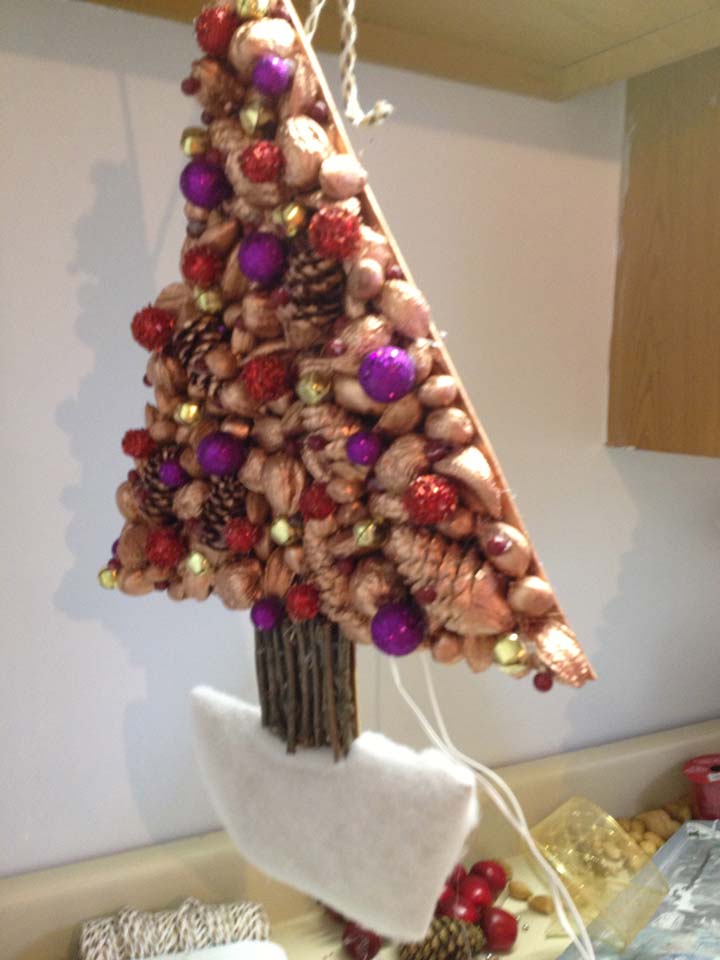

Step 11: If you see the need, which we did, glue felt to the back of your tree (small circles will do) to spots of the tree that might rub against the door or wall you will hang it on. You don’t want to scuff your walls, and small circles of felt in the corners and around the wire will help.
Step 12: You are done! Hang your tree up for the holiday season and admire.
This was definitely best part of my holiday break, which is saying a lot because I had an amazing holiday break. I loved doing such a fun and sentimental project with my dad. We have one more base for next year. Dad’s got grand plans for how to make our next trees even better.

Thanks for the great idea, Dad 🙂 Love you.

One last thing…. happy birthday to my awesome mother-in-law, Robin!


