Craft Projects, Jewelry

Green mesh-like pendant

{A Smith of All Trades) Green necklace

I don’t really know what to call this necklace I made this past weekend, so let’s call it a mesh-like pendant. All in all, it was a little tricky to make, but I think it is pretty and very unique, so here goes!

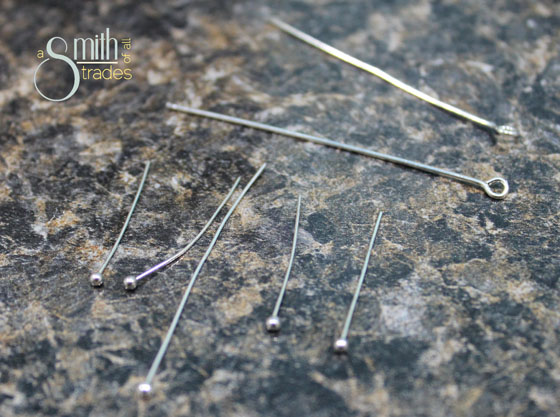
For this project you’ll need elongated beads (pearls are optional), eye pins (a loop on one side, a pin on the other), and some chain.

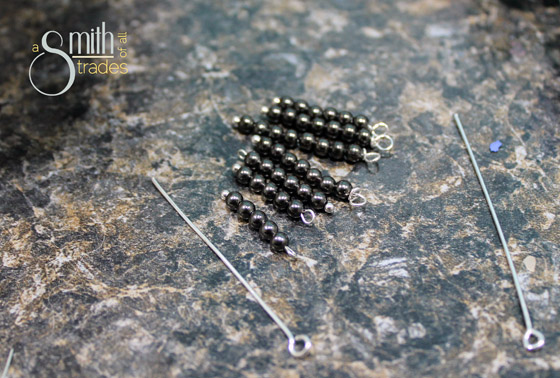
To begin, stack one of your beads and a pearl on an eye pin, and close the other end into a loop. Make a second eye pin in the same way and connect the two where the pearls meet. I suggest using a jump ring in the middle (not seen in the photo below because I realize this a few eye pins into the pendant).

{A Smith of All Trades) Green necklace

Now, make an eye pin with one bead and no pearl — take this and connect it to the two green ends of the two eye pins that connect to the jump ring in the center.

{A Smith of All Trades) Green necklace

Continue this process (eye pin + jump ring + connect eye pins) until the pendant cannot go anymore.

With the beads that I used, I couldn’t go in a full circle, so at that point I stopped.

{A Smith of All Trades) Green necklace

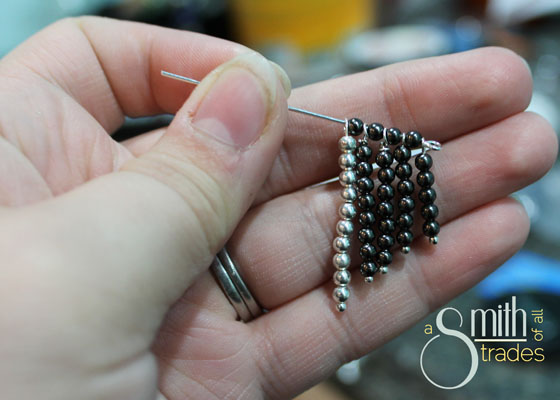
At this point, I connected the three ends with chain, then added the entire pendant onto a silver necklace.

{A Smith of All Trades) Green necklace

Pretty, huh?

{A Smith of All Trades} Green Turquoise and Pearl Necklace

And, it doesn’t look half bad on either. Sorry… this was the best picture I could get of it haha. I’m not super used to my honkin’ camera yet!

{A Smith of All Trades) Green necklace

And a crappy iPhone one for good measure.

{A Smith of All Trades) Green necklace

Craft Projects, Jewelry

Geometric necklace

Update: I pretty much wear this necklace every day. I love it.IMG_0560

Ever have a project that starts out one way and ends completely differently? I wanted to make a pair of earrings that were inspired by something I saw on Pinterest a week or so ago, so I pulled out my beads and supplies and started fiddling with the beads. The further I got into my project, the more I wanted to create a necklace. I started with one color of bead and a small geometric shape, and I ended up with two tones of gunmetal and a wider pendant.

Onto the tutorial.

{A Smith of All Trades} Geometric Necklace

I started this project with one long eye pin, and 11 head pins (eye pins hav a loop at the end so you can connect them to other things; head pins have a flat or round end meant to stop beads from falling off).

{A Smith of All Trades} Geometric Necklace

On each head pin, I placed a specific number of beads. The number was important because it would help make my geometric shape later on. Here’s the pattern I ended up using (it’s not what I started with). 3: silver, 5: gunmetal, 6: gunmetal, 7: gunmetal, 8: gunmetal, 10: silver, 8: gunmetal, 7: gunmetal, 6: gunmetal, 5: gunmetal, 3: silver.

When each head pin had the correct number of beads on it, I twisted the end into a loop to stop beads from falling off the open end.

{A Smith of All Trades} Geometric Necklace

Next, I grabbed my eye pin and started threading the head pins on the order I specified earlier. In between each head pin, I place one gunmetal bead.

One the entire eye pin was threaded with head pins, I closed the other end using round-nosed pliers.

{A Smith of All Trades} Geometric Necklace

Time to add the chain. At first, I added a long chain so this would hang low in my chest. I later went back and added a clasp so it would hit above my chest (I told you I changed my plans a ton!).

To add the chain, I simply cut the amount I wanted, then opened each end of the eye pin and placed a link in the wire. For the clasp, you can attach it in the same way using a jump ring.

{A Smith of All Trades} Geometric Necklace

I really like this necklace a lot. Now that I have a good pattern to follow, I think I’ll try to make it again in funkier colors.

{A Smith of All Trades} Geometric Necklace

Happy St. Patrick’s Day!!

{A Smith of All Trades} Geometric Necklace

Craft Projects, Paint, Quick and Easy Crafts

Painted Frame Mats

{A Smith of All Trades} Painted Frame Mats

I have been trying for about a year now to accessorize our house with adorable and mushy pictures of us, cutesy pictures of our pup, and wonderful photos of our families. Last night, in between cleaning out a hall closet and playing with my pup, I attempted this feat again. I broke out my stash of picture frames and rearranged a few shelves in our living room. I set my sights on this trio of white frames — I love the white frame with the patterned, yellow mat that I bought from Target a bajillion years ago. The other two frames are just… meh. Boringggggg.

I picked them up from the thrift store last year and never did anything super exciting with them. Last night I changed that.

I pooped the mats out and dashed off to my craft room to unearth some paint!

One mat got a green polka dot treatment using the end of a pen.

{A Smith of All Trades} Painted Frame Mats

The other got a blue chevron stripe. I did both by hand and just eye-balled in. After all, the other side is free for painting if I screwed it up!

{A Smith of All Trades} Painted Frame Mats

Once my mats were dry, I popped them back into the frames and set them on a shelf in our living room. Lord knows this won’t be their last home, but for now they are quite the colorful and cheery trio.

{A Smith of All Trades} Painted Frame Mats

{A Smith of All Trades} Painted Frame Mats

Cute, huh? Now I need some purple and orange and I’ll have a whole rainbow of frames.

{A Smith of All Trades} Painted Frame Mats