Christmas, Craft Projects, Holiday, Wine Crafts

Wine Cork Rudoplhs

wine rudy2

OMG OMG OMG OMG. A CRAFT POST.  A CHRISTMAS CRAFT POST!!!!!

Holy smokes, she’s back! Yup, this craft blogger has some crafts to show you! I mentioned a few posts back that I have ben focusing lately on getting healthy and losing weight — well, I am more than 30 lbs down (Thank goodness! Chubby me was tired of being chubby!) and feel like I have a much better grasp on the balance between eating, exercising and all other fun activities like CRAFTS!

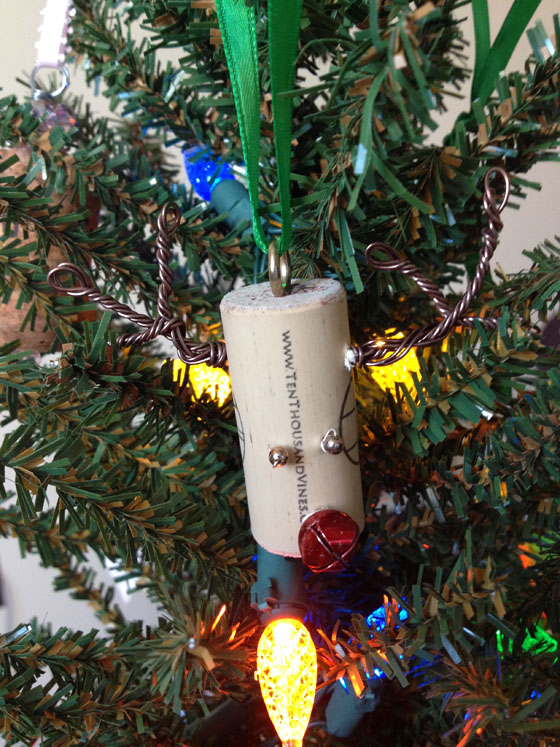
Enter Rudolph the wine cork reindeer!

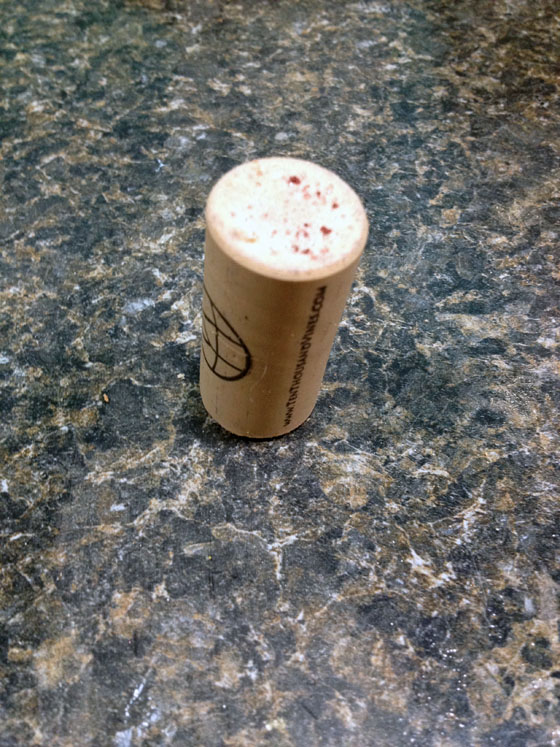
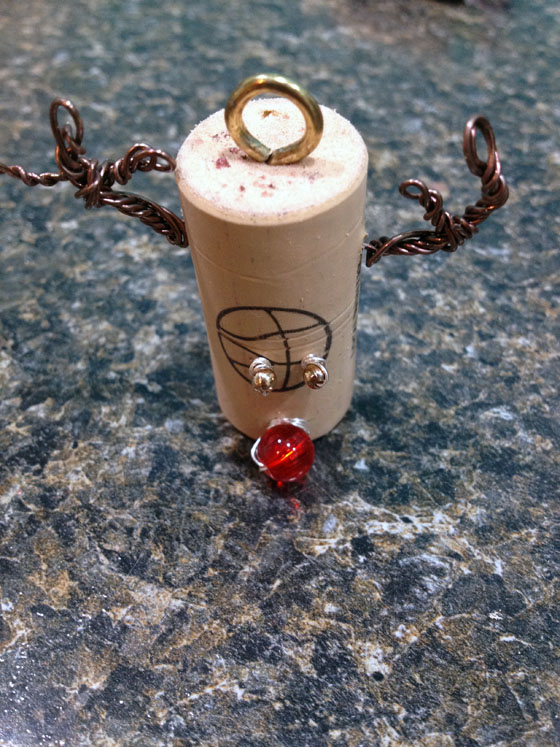
To make this freakin’ adorable ornament, first start with a cork. I like the corks that aren’t true corks. They have a layer of skin (almost) to them that makes this project easier than if you were to use a true cork.

Cork Rudolph_1

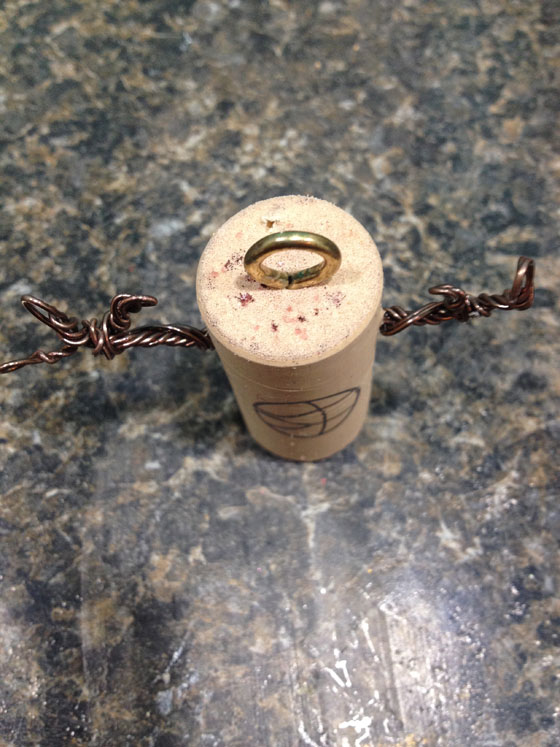
Drill through the cork — don’t go top to bottom, rather drill through the side of the cork, somewhat near the top. This will be the heigh of your antlers.

Cork Rudolph_2

Cut a long piece of malleable brown wire and fold it in half. Stick the wire through your drilled hole, sending the folded end through the cork first. I learned the hard way that it is much more difficult to get your wire through your cork if the sharp end leads the way.

Cork Rudolph_3Your cork should sit in the middle of your wire.

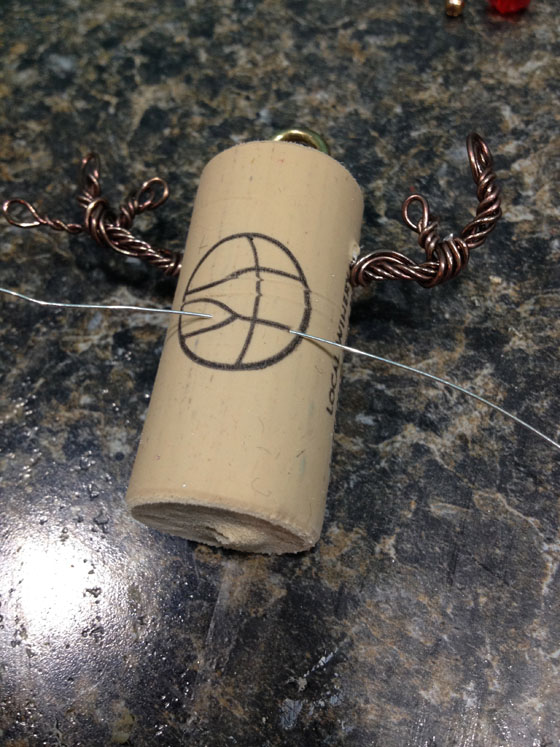
Next, it’s time to form your antlers. I folded the wire about 1.5 inches from the base and twisted the wire until it touched the cork. Then, with the extra wire I wrapped back up the twisted portion and did this again. I ended up with three-pronged antlers, with the extra wire wrapping down along the base of each. Do this on both sides.

Cork Rudolph_4

Once the antlers were on, I screwed an eye hook into the top of the cork to make this an ornament.

Cork Rudolph_5Time for the eyes and nose!

Here’s where your cork having “skin” is important. I took a nail and pressed it through the skin of the cork as an appropriate eye level for rudolph. It went in at one point and came out another — these entry/exit points are where the wire will enter and exit.

Cork Rudolph_6

Once you create your hole and feed your wire through, add see beads for eyes. Get them as close to the cork as possible, then wrap wire around the base of each eye to secure them to the cork.

Cork Rudolph_7

One eye!

Cork Rudolph_8

Two eyes!

I used this exact same process for the nose. I tried to make the entry and exit points closer together when feeding the nail through the cork since the nose didn’t need no be spaced far apart like the eyes. I used beads and bells on different ornaments, but each one needs to be secured to the cork by wrapping the wire around the base.

Cork Rudolph_9

The final step is to add a ribbon! Voila! Rudolph the Red-Nosed Wine Cork!

CORKRUDY

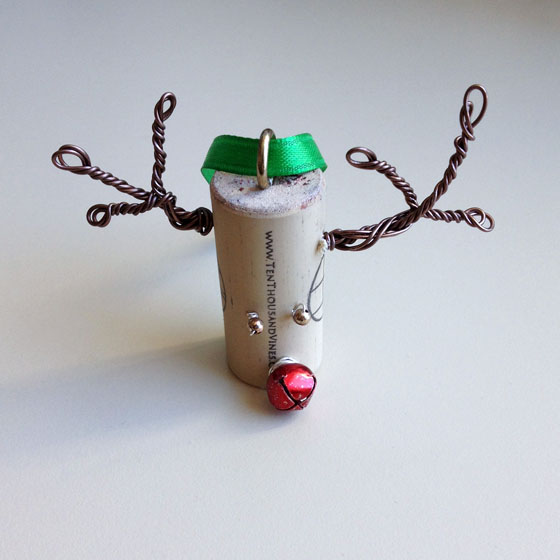
Cork Rudy is hanging on my mini tree in my office. Yes, I’ve started decorating already 🙂

IMG_0033

Christmas, Craft Projects, Holiday

Christmas Tree craft

IMG_2480

I got the best Christmas present ever when my dad called me on Dec. 23 to ask if I wanted to do a Christmas craft on Christmas Eve morning before all of our festivities began. I said yes (duh) and dad went out hunting for supplies. When he was younger, his mom made Christmas trees out of mixed nuts that she decorated and hung on a wall in their home. He wanted to make one just like it for his home and for mine.

For this project we used:

  • Thin sheets of wood
  • Hot glue
  • Nuts in their shells (three or four bags)
  • Pinecones
  • Metallic spray paint
  • Small ornaments
  • Fabric
  • Batting
  • Drill
  • Jigsaw
  • Wire
  • Felt

Step 1: Bake pinecones to kill any critters that may be living inside. Bake for 25 minutes at 200 degrees. That should do the trick. We gathered ours outside of our gym at 6:30 a.m. … in the dark. I’m sure we looked wayyy creepy.

Step 2: Sketch out a tree shape onto a piece of wood. We drew a triangle for the tree, a small rectangle for the stump and a trapezoid for the base.

Step 3: Cut out your tree using a jigsaw (or a hand saw if you prefer).

IMG_2394

Step 4: If you want to make more than one, use your cutout tree as a stencil and trace it onto the first sheet of wood.

Tree stencil

Step 5: Drill a hole in the top of the tree and string wire through to make it easy to hang later on.

IMG_2398

Step 6: Start gluing on your nuts and pinecones. I used a pine cone for the top of my tree. Dad used a prickly seed from a sweet gum tree as his topper.

IMG_2399

It is OK to have gaps in your nuts and pine cones because you’ll be filling it in with ornaments later on.

IMG_2402

Step 7: Spray paint the top of the tree using a metallic spray paint of your choice. Dad went with a bronze metallic.

IMG_2401

I chose a metallic silver for mine.

IMG_2403

Step 8: Once your tree is painted, it is time to create the trunk. I clipped edged of pinecones and glued them onto the trunk.

IMG_2404

Dad went with thin twigs. If you’d like your trunk to be the same color as your tree, do this step right after gluing on your nuts.

IMG_2405

Step 9: Glue your ornaments onto the tree.

Step 10: Cover the base of the tree in batting. Then, cover with fabric. Our wood wasn’t thick enough for staples, so we hot glued all of our fabric and batting directly to the wood.

IMG_2408

IMG_2407

Step 11: If you see the need, which we did, glue felt to the back of your tree (small circles will do) to spots of the tree that might rub against the door or wall you will hang it on. You don’t want to scuff your walls, and small circles of felt in the corners and around the wire will help.

Step 12: You are done! Hang your tree up for the holiday season and admire.

This was definitely best part of my holiday break, which is saying a lot because I had an amazing holiday break. I loved doing such a fun and sentimental project with my dad. We have one more base for next year. Dad’s got grand plans for how to make our next trees even better.

meanddad

Thanks for the great idea, Dad 🙂 Love you.

IMG_2479

One last thing…. happy birthday to my awesome mother-in-law, Robin!

Christmas, Holiday, Life

Merry Christmas

Merry Christmas everyone!!! I hope your holidays were and continue to be wonderful.

20121225-235550.jpg

20121225-235557.jpg

20121225-235604.jpg

20121225-235617.jpg

20121225-235622.jpg