Christmas, Craft Projects, Holiday

Christmas Eve Craft: Wooden Tree

Last year, err 2012, my dad and I did a craft on Christmas Eve. It was one of the highlights of my Christmas break and I was looking forward to doing one again this holiday season. My family loves traditions, and when you do something awesome, why not do it every year?!

meanddad

Well, turns out my dad scheduled carpal tunnel surgery the Thursday before Christmas Eve. ON BOTH HANDS! He is crazy, and tough, and did I mention crazy?

If I had asked him to Christmas craft with me on Christmas Eve, he probably would have said yes. So I didn’t ask. Sometimes the kid has to play parent.

Instead, I set out to make a craft as a final Christmas gift for him.

When we made our Christmas Tree craft in 2012, we cut out one extra base for this year — we had grand plans to make a light up tree!

Tree stencil

With the base already cut, I got out my supplies for my craft: shims, paint sticks, Minwax stain cloths, wood glue and battery operated lights.

First, I cut off the “tree stand” from the tree we created last year. Basically, I trimmed down the tree so it was a triangle with an itty bitty rectangle stump.

Then, I lined my shims and paint sticks in rows to see how many I had and if I wanted to cut any down to size.

Christmas Craft Shims

I definitely had a few to trim and sand, but first I got to staining.

Speaking of stain, I was fortunate to receive a few Minwax goodies before the holidays. One of the goodies I got was a new product I hadn’t heard about. Minwax now makes stain cloth wipes! They look kinda gross (OK, really gross), but they are awesome.

Christmas Craft Shims minwax wipes

I wanted two different tones of wood on the tree, so I opened both pouches. Each wipe is soaked in stain and each pouch comes with a handy set of gloves (it’s like they know I won’t wear gloves if they aren’t taped to the package!)… use a wipe, toss wipe, toss gloves, you are clean! I am pretty sure this product was designed for me…

Christmas Craft minwax wipesAwesome, huh?

Christmas Craft Shims stained dark

I let the stained shims dry for about an hour before moving on with the project.

Christmas Craft Shims Stained

Dry stain meant time to get moving. I was doing all of this on Christmas Eve after all. I used wood glue to adhere the shims to the tree base (after trimming down a few here and there with a hand saw). When all of the shims and paint sticks were in place, I smushed the entire tree under a heavy bin to put pressure on the shims to help them stay in place.

Christmas Craft Assembly

With the three dried and holding up well, I moved onto the lights. I bought battery-operated LED lights from Target. The strand had 18 itty bitty lights on it, so 18 itty bitty holes I drilled. I taped all of the wired down against the back of the tree and added the battery pack to the back with velcro command strips. Last, I drilled a hole in the top and wove a ribbon through the top.

Unfortunately, this next picture doesn’t do the tree justice. But in the hustle and bustle of the holiday, I didn’t really care to get the perfect picture. Forgive me?

Christmas Craft Complete


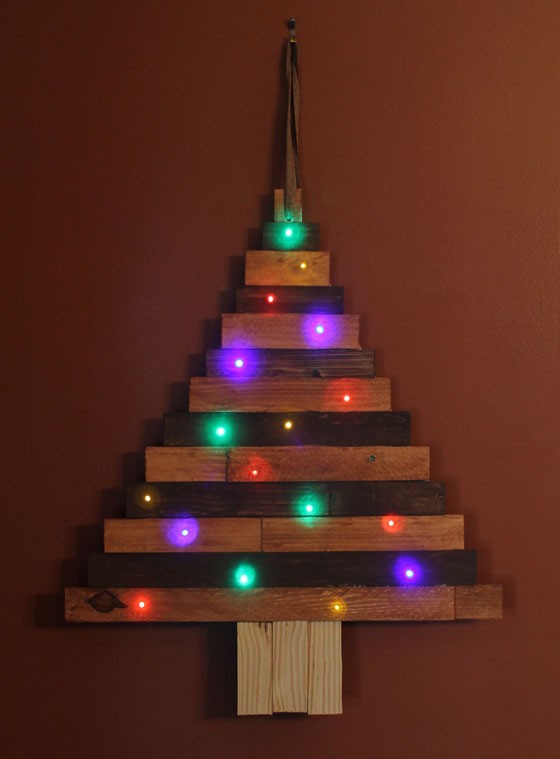
All that really matters is that my dad loved the tree. He hung it up immediately 🙂 In 2014, we are definitely crafting together though. That was just better, even if my tree is pretty darn cool.

Did I mention the lights twinkle, too? Light-up tree? Mission accomplished!

Craft Projects, Furniture, Jewelry

Jewelry Box reveal… finally!

How sad is it that I’ve had this project complete for months and still haven’t shared it!? Very sad.

Oh well! The time has come to share my jewelry box project that took me months to do because I couldn’t decide what the heck I wanted.

Jewelry box before

I found this jewelry box in an antique store for 50% off, so I got it for a steal of $20-some bucks. Some of the jewelry boxes I was looking into buying cost more than $100, so that seemed like a great price.

I wanted to get rid of the gold tone to the wood and the stinky smell in the drawers so I decided to paint the whole think and rip out the fabric liner.

Jewelry box drawers

It’s not that the liner wasn’t nice… it just was horrendous haha. And scratchy! The only really nice piece of jewelry I own is a strand of pearls that my hubby gave me at our wedding, and it would be ruined resting on that. So yeah, it had to go.

Jewelry box white

Once the drawers were cleaned out, I started to paint. And paint. And paint. And paint.

Sometimes I forget how many coats white paint takes to cover. Holy cow. When I was pleased with the coverage, I added a stencil.

Turns out, I am god awful at stenciling, so I messed up the paint job pretty badly. Once it dried, I decided to just distress the whole thing. Good choice!

I stained over the paint and gave the whole thing a coat of polyurethane.

For the knobs, I reused the same knobs that came on the jewelry box. They fit perfectly and I thought they looked nice with the distressed vibe. For the drawers, I lined each with jewelry making mat (after I botched lining it with velvet. That was just terrible).

After months of working on it off and on, I finally finished the darn thing.

jewelry box4

I am in love.

Jewelry box

jewelry box2

So it took me forever to show you, but was it worth the wait?!

Jewelry box finished

I hope so 🙂

Christmas, Craft Projects, Gift Idea, Holiday, Pallet Projects

Mini Anchor Sign

One of my really good friends love to sail and is soon to be sailing a boat in the Caribbean with her hubby — what a neat vacation idea!

I wanted to make her something for Christmas so I grabbed a leftover piece of pallet wood and brought it inside to make a sign with an anchor on it.

Pallet wood is really…. splintery. So I sanded and sanded and sanded. And when I thought I was finished, I wasn’t, so I sanded some more.

IMG_2074

When the wood was smooth enough to work with, I sketched an anchor onto it. It wasn’t pretty, but it was good enough.

IMG_2075

Nice anchor, huh? I didn’t care about the terrible sketch because I filled the entire thing with gray and black paint. Then, I wrote her last name on the sign.

IMG_2076

With the sign painted, I needed to drill holes big enough to pass a small rope through, so I busted out the drill and created two holes at the top.

Then, I used a water-based stain to color the wood. I’ve never used water-based stain before, but I like it a lot. The wood soaks it up right away and there is a huge variety of colors to choose from. The color I picked for the sign was Minwax’s Driftwood stain.

I only used one coat for the small sign, then I let it dry overnight.

Then next day I touched up some of the paint, mainly the black lines, and added rope and an anchor button so my friend could hang her sign.

Here’s the finished product:
IMG_2117


I gave her the sign yesterday and she really liked it. Yay!
IMG_2120