Christmas, Craft Projects, DIY GIFT GUIDE, Gift Idea, Holiday, Jewelry, Quick and Easy Crafts, Wine Crafts

DIY GIFT GUIDE: Wine Cork Necklace

Wine Cork Cover

Day 5! This project is so versatile, depending on the corks you save. From a dark brown cork to a stark black cork to a lighter neutral cork, this necklace can turn out so many different ways.

I know I do a lot of wine cork projects, but I really love this one.

Supplies: 

  • Cork
  • Drill
  • Wire
  • Beads
  • Chain

Steps:

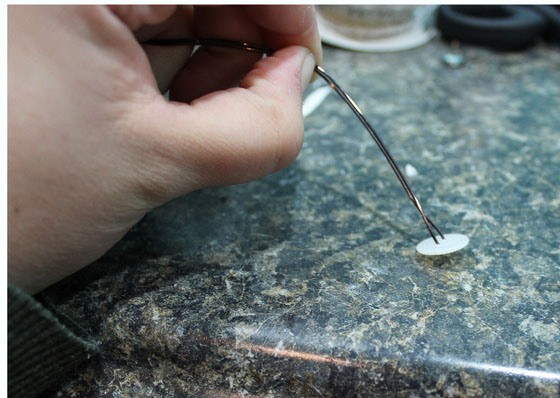
  1. Drill a hole straight through your cork, top down.
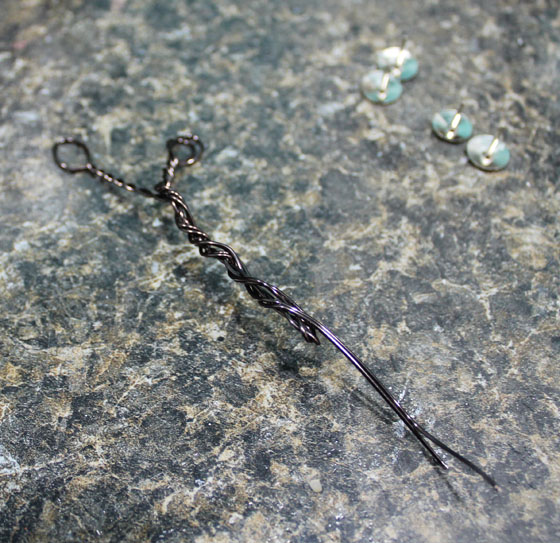
  2. Bend the wire in half and place a single bead on one strand. This acts as a stopper so the remaining beads don’t fall off.
  3. Place other beads onto both wires, feeding both wires through the same end of the bead.
  4. Bend the top of the wire and insert the bent wires through the cork. By bending a small part at the top in half, this allows the wires to go more smoothly through the cork.
  5. Once the wires are through, place beads on the other end.
  6. Twist both wires into a loop, then secure the wires by twisting them around the base of the loop.
  7. Thread chain through the loop and secure both ends with a jump ring. If you’d prefer a shorter chain, attach a clasp to each end instead.

Wine Cork Necklace

I like this black necklace because you don’t realize what it is immediately.

My favorite is a necklace I made out of a cork from one of my favorite wines. It has an armored knight riding a horse and it is SO COOL.

Cork Necklace

Really, I like them all.

What do you think? Would you wear it? I brought them to my craft fair thinking people would eat them up, but no one bought any. Who knows. I apparently haven’t a clue about my market haha.

Christmas, Craft Projects, DIY GIFT GUIDE, Gift Idea, Holiday

DIY GIFT GUIDE: Snowman Ornament

DIY GIFT GUIDE Snowman Ornament

Day 4 of the DIY GIFT GUIDE series brings us this adorable snowman ornament. If this guy doesn’t belong on your Christmas tree, I don’t know what does.

Supplies:

Styrofoam Balls

  • Styrofoam balls in three varying sizes
  • Craft Wire
  • 2 black beads
  • Silver tacks
  • Ribbon
  • No-Fray
  • 1 button (white)
  • Hot Glue

Steps:

  1. Cut a long piece of wire and bend it in half. Feed it through two holes of a white button. This will secure the styrofoam balls to the wire.Button through Wire
  2. Feed the wire through the largest of the three foam balls. Try to get the wire to go straight through the middle so the snowman isn’t off kilter.Ball on wire
  3. Stack the remaining two balls on top of the first with the medium ball next and the smallest ball on top. In between each ball, place a small bit of hot glue on the wire to keep the ball secure once it is in place.
  4. When the snowballs are assembled, secure them at the top by making a wire loop, then wrapping the remaining wire around the base of the loop. Add a thin ribbon here to hang the ornament.Snowman assembly
  5. Next, create the snowman’s face by firmly pushing two black beads into the styrofoam for the eyes. I used faceted beads, not round beads, thinking they’d stay in better.
  6. For the mouth, take a small pice of craft wire and bend it into a smile. Then, form 90 degree bends at the end of the smile and push it into the styrofoam.
  7. For the buttons, take silver tacks and stick them into the styrofoam to act as buttons. Place a dab of hot glue under each one so they don’t loosen and fall out over time.
  8. The scarf is next. Find a thick piece of ribbon and tie it around the snowman’s neck. Then, take scissors and “fray” the end of the scarf by cutting small slits. Use no-fray to seal the ends so the ribbon doesn’t unravel.
  9. Take a long piece of wire (12″) and fold the wire in half. Twist the wire until it is 1/3 of the way twisted. Then, take the straight wire and wrap up the twisted portion. When the wire reaches an inch from the top, start twisting again. This will form the two forks in the arm. When both forks are twisted, wrap the remaining wire down the base of the arm, then stick the wire bottom into the styrofoam. Secure with glue and repeat.Wire arm
  10. Hang snowman ornament on tree!

Snowman ornament

Snowman

Check back tomorrow for another DIY GIFT GUIDE post! Hope you are getting some good holiday gift inspiration.

Christmas, Craft Projects, DIY GIFT GUIDE, Gift Idea, Holiday, Quick and Easy Crafts, Wine Crafts

DIY GIFT GUIDE: Cork LOVE Magnets

Cork LOVE Magnets

Day two of the gift guide and what do we have — stamped cork magnets!

If you don’t think these are adorable, well you might be cray cray.

You’ll love how easy peasy this project is. It takes 5 minutes, tops!

Supplies: 

  • Corks
  • Small stamps
  • Magnets (Michaels sells round magnets that are slightly smaller that a cork round. Match made in heaven? I think so!)
  • Ink
  • Hot glue
  • Cutting tool

Steps:

  1. Like in yesterday’s post, carefully slice your corks to about a 1/2-inch thickness. You can use a steak knife, scissors (if the are really sharp) or any other tool you have that might cut through the cork.
  2. Stamp each cork round with your small stamp and ink. It might take you a few tries to get your stamp centered the way you like it. Some of the LOVE stamps looked more like LOVF. Oops.
  3. Place a dab of hot glue on the back of the cork and secure it to the magnet. Let cool.
  4. Stick your magnets on your fridge and marvel at their cuteness.

Love Magnets

Is there a wine lover in your family who would love these!? There are definitely a few people in my family who I think would like them!

Love magnets2

Check back tomorrow for the next DIY gift post!