Craft Projects, Wreath

Floral centerpiece

Flowers on crate

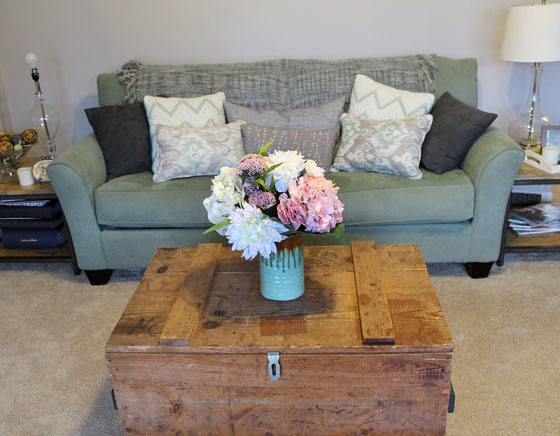
The hubby gave me beautiful pink flowers recently that I happily placed on our crate coffee table in our family room. Now I am not a pink girl — not in the least bit. But the pop of pink against our gray walls and surrounded by the cool colors I tend to prefer, well, it just worked!

Once the flowers died I knew that I wanted to make a flower centerpiece for that room using the pinks that looked so great.

So this past weekend I spent and hour — AN HOUR — in Michaels flower section picking out just the right flowers. I am really picky when it comes to fake flowers. If they are trying to look real, but are so obviously fake, then I don’t want anything to do with them. So that leaves me with flowers that are pretty but obviously not real and then the really good imitation (read: really expensive) flowers.

For this arrangement, I opted for the most realistic flowers I could find. Thankfully the flowers were 40% off and I had a 20% off coupon, or my centerpiece would have cost $75 just for the flowers! Um, no thanks!

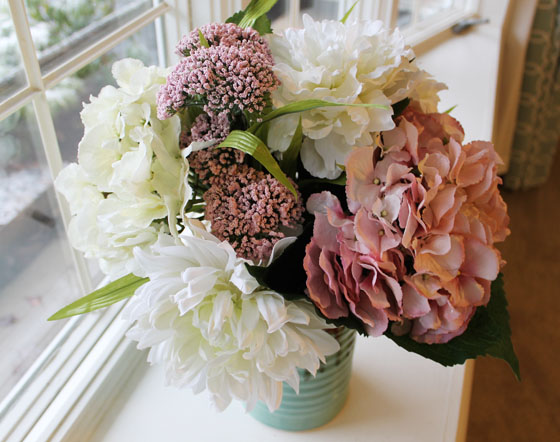
After carefully selecting the flowers I wanted and some floral foam, I rushed home to create my work of art. I used a gorgeous vase I bought last summer in Lancaster, Penn. When I saw the vase I knew I had to have it, even if I didn’t have an immediate use for it. I thought maybe I’d use it to hold kitchen utensils, but it didn’t looks so great with my green walls. So it’s been sitting in my basement for 8 months begging to be used.

I cut the floral foam to fit into the bottom of the vase, then started cutting the fake flowers to length and sticking them into the foam. After several different arrangements, I had something I was happy with (mostly). I took a couple of grocery store baggies and stuffed them into the base, then poured small rocks on top to hide the bags. This helps keep the flowers from shifting too much, allowing the centerpiece to keep its shape over time.

I think I’ll probably add in a few more flowers into the few gaps, but I love this so much I can’t even tell you. It makes me smile every time I walk by it. I can’t tell which I’m happier by — flowers year-round or the fact that I finally put my beautiful pottery to use. ❤ Love.

Floral Arrangement

Flowers in room

Christmas, Craft Projects, Holiday, Wreath

Christmas Centerpiece

How many times can I say I have awesome neighbors?

Well, it’s just true and I’m gonna keep shouting that I love them. Because they rock.

Sunday, our neighbor came over to watch football with Brian, so the wives got together and hung out too! But get this, we cleaned! Ye, that is a good friend. Allie and I cleaned the hell out of my craft room, which so desperately
needed it. I threw away a ton of stuff that I wasn’t going to use. I have a pile of crafts to gift this Christmas. And I have a bunch of stuff to donate.

While cleaning, we also found/rediscovered some materials I had bought in the past two years and just never got around to using. For example, a floral ring. Turns out, I had a perfect glass dish (it holds the dip in our now-deceased chip and dip set… thanks, Brian haha) to fit in the center.

So after we cleaned, we headed to Michaels and bought some fake winter foliage to make a Christmas centerpiece.

This project was so easy and would make a great gift. And if you get to Michaels when they are having a sale (50% off of all holiday flowers and an extra 25% off!), it’s not terribly expensive.

I started with the floral ring, and I bought the flowers and the silver charger ($2) at the craft store.

I started by tearing up the floral pieces that I got so each branch, pearl, stem, etc. was separate. Then, I glued the floral ring to the center of the charger.

Starting at the bottom, I started to place large piece of evergreen around the base.

Christmas Centerpiece beginning

And basically, that’s it. No more gluing — just sticking! I worked my way around and around and around. And when I thought I might be done, I wasn’t. So I added more. Once the greenery had good coverage, I added white and silver pearls. These are also available in the floral section and come on wire. So again, just stick ’em where you want ’em.

An important thing to note — I left the center untouched so my dish would still fit in the center. I did place evergreen along the top edge of the center, but nothing in the actual hole in the center. I will be using a fake candle, so I wasn’t too worried about things catching fire.

Christmas Centerpiece

So what do you think!? Isn’t it purdy? I don’t think I would have ever thought to do this if it weren’t for Allie. She was going to make it for me, but she was going to use real plants and that would have kicked it after a season so I opted for fake.

Christmas Centerpiece lit up

She did do another project for my house while I made this centerpiece and hers is even more beautiful.

Centerpiece

I ❤ neighbor craft nights!

What Christmas crafts have you all been up to? I have a lot more things I want to make this year. Here’s hoping I have time!

Home Improvement, Paint

Chevron Accent Wall

Last night I was beyond hyper and spontaneously decided to tackle my faux backsplash/accent wall in my laundry room. I think my spontaneity was key in the project, otherwise I would have over thought everything from the design to the colors.

I have seen so many designs online lately for accent walls: quatrefoil, shell, stripes, chevron… you name it, it’s been done. In my cracked out state, I went with a segmented chevron pattern and I LOVE IT. Also, it was way easy. Way.

I was too into groovin’ to my sweet tunes last night to take a ton of photos (imagine a quality mix of Bohemian rhapsody, Baby got back and Beloved)  but here’s the gist of what I did: I wanted the wall color to show through my pattern so it tied the accent wall into the rest of the space, so using 1″ tape I taped vertical stripes on my wall with no intention of filling them in. I spaced my lines out using a small level as my measurement. Honestly, I did this to avoid doing math. It’s about 9″ wide and was a perfect spacer. It also doubled as a level — go figure. I made sure my lines were pretty darn straight. They weren’t perfect, but they were mostly straight.

Then, I started to create my chevron pattern. I grabbed a pen and started marking my tape where other pieces of tape needed to intersect. Again, I used my level as a spacer. I placed it at the top of my cabinet and marked at the bottom, continuing until it wouldn’t fit anymore. I did this for all of the tape, then connected the dots.

Here’s a fun tip — if and when you run out of your painter’s tape, and if you just so happen to have masking tape or washi tape in the same width, you can use it as a substitute for painter’s tape. Yes, this happened. I was sad to paint over my mint tape, but didn’t want to lost my awesome energy and stamina with the project so I made the sacrifice.

{A Smith of All Trades} Chevron wall taped up

With my pattern taped and ready to paint, I started to apply my paint colors: metallic gold (Thanks, Martha!) and ivory/manilla. I originally was going to do something with bolder pops of color, but went for the metallic paint as my bold choice. I also was going to add a third color, but my pattern only took up so much room and the third color probably wouldn’t have added anything to it.

{A Smith of All Trades} Chevron wall taped up and painted

I painted two coats of each color onto the stripes before removing all of the tape.

*Drumroll*

{A Smith of All Trades} Chevron wall

Love love love love love love love. Love. Had I thought this project out more, I probably would have gone with a mint or teal chevron stripe, but I am so glad I didn’t. I think the gold tones play off the countertop wonderfully, and make the gray cabinets pop even more.

I started this project after dinner at 5:30(ish) and was cleaning up at 7:30 p.m. — not to bad for the fabulous result!

BEFORE:

{A Smith of All Trades} Laundry Room

AFTER:{A Smith of All Trades} Chevron wall again