Craft Projects, Jewelry

Geometric necklace

Update: I pretty much wear this necklace every day. I love it.IMG_0560

Ever have a project that starts out one way and ends completely differently? I wanted to make a pair of earrings that were inspired by something I saw on Pinterest a week or so ago, so I pulled out my beads and supplies and started fiddling with the beads. The further I got into my project, the more I wanted to create a necklace. I started with one color of bead and a small geometric shape, and I ended up with two tones of gunmetal and a wider pendant.

Onto the tutorial.

{A Smith of All Trades} Geometric Necklace

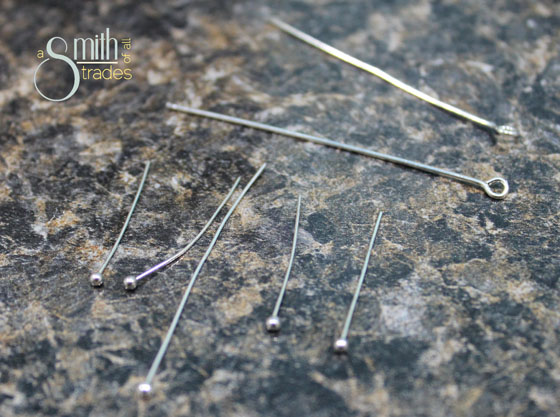
I started this project with one long eye pin, and 11 head pins (eye pins hav a loop at the end so you can connect them to other things; head pins have a flat or round end meant to stop beads from falling off).

{A Smith of All Trades} Geometric Necklace

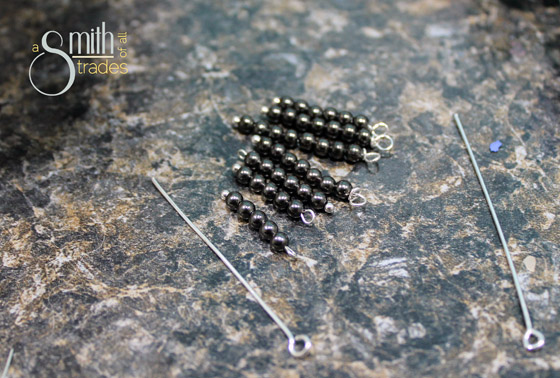
On each head pin, I placed a specific number of beads. The number was important because it would help make my geometric shape later on. Here’s the pattern I ended up using (it’s not what I started with). 3: silver, 5: gunmetal, 6: gunmetal, 7: gunmetal, 8: gunmetal, 10: silver, 8: gunmetal, 7: gunmetal, 6: gunmetal, 5: gunmetal, 3: silver.

When each head pin had the correct number of beads on it, I twisted the end into a loop to stop beads from falling off the open end.

{A Smith of All Trades} Geometric Necklace

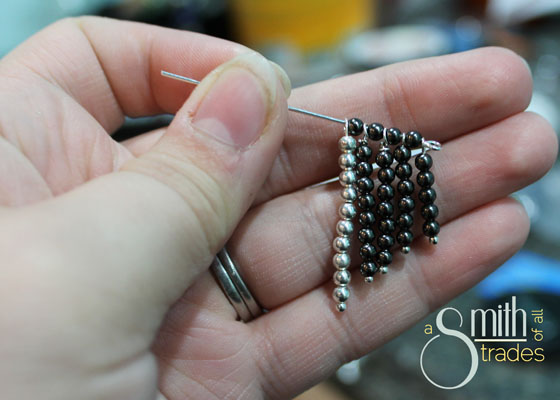
Next, I grabbed my eye pin and started threading the head pins on the order I specified earlier. In between each head pin, I place one gunmetal bead.

One the entire eye pin was threaded with head pins, I closed the other end using round-nosed pliers.

{A Smith of All Trades} Geometric Necklace

Time to add the chain. At first, I added a long chain so this would hang low in my chest. I later went back and added a clasp so it would hit above my chest (I told you I changed my plans a ton!).

To add the chain, I simply cut the amount I wanted, then opened each end of the eye pin and placed a link in the wire. For the clasp, you can attach it in the same way using a jump ring.

{A Smith of All Trades} Geometric Necklace

I really like this necklace a lot. Now that I have a good pattern to follow, I think I’ll try to make it again in funkier colors.

{A Smith of All Trades} Geometric Necklace

Happy St. Patrick’s Day!!

{A Smith of All Trades} Geometric Necklace

Craft Projects, Jewelry, Quick and Easy Crafts

DIY Button Ring

Button Ring cover

Today has not been my day. After getting all decked out in Ravens gear and heading to Baltimore for the parade, we instead sat in terrible traffic. Then, when we got into the city, they promptly redirected us right back out onto the highway. No Super Bowl celebration for us. So sooo bummed.

Instead I worked like most everyone else, which is good because I had stuff I needed to do. So, instead of Super Bowl celebration photos, here is a post I had scheduled for Wednesday for your enjoyment 🙂

I showed you how to make a few different types of button earrings in my last few posts, so today I’ll share how to make a button ring. It’s a little trickier than the earrings. All you need is a button, some hard wire, some pliers, and something to bend your wire around so it stays round — I have a ring sizer I use specifically for making rings.

Button Ring2

Thread your wire into your button holes.

Button Ring3

On the under side of the button, bend the wire in opposite directions. Then, send one of the wires back up and down through the holes again. Twist the wires around one another so the button will not fall off the wire if you let go.

Button Ring4

Then, wrap your wire around something that will hold the round shape. I chose to have a thicker band, so I wrapped the wire around my ring sizer four times.

Button Ring5

Next, starting with one side and at the base of the button, start wrapping the leftover wire tightly around the ring band.

Button Ring6

Do the same to the other side. Stop when you get all of the way around, or when both sides are even. If you wrap the wire around the entire band, your ring will be a lot smaller than you originally sized it to be, so keep that in mind.

Button Ring7

Cut the excess wire off and fold the edges down against the band. With that, your ring is finished!

Button Ring9

Button Ring

Button Ring8

Pretty darn cute, right?

Craft Projects, Jewelry, Life

Ravens Win the SUPER BOWL! … and another set of earrings, too.

What a SUPER weekend (pun intended)!

If you follow my blog, you know my husband and I are really big Ravens fans. Now we are Super Bowl champs!!! So exciting. We spent all weekend getting ready to host  a few friends and mentally preparing for what was an awesome game. We are even going to the Super Bowl homecoming parade tomorrow in Baltimore!!!!

Even Remmy had a great time during the game. He scored lots of delicious treats and got to pretend he was a person, which is pretty much his favorite pastime.

Remmy Ravens Jersey

While not in football mode, we also helped my mother-in-law paint her textured ceiling in a room she is redoing. The ceiling was dingy from years of fireplace soot hitting it, and now it is bright and white as snow. I much preferred painting her ceiling than ours — the texture really hides any imperfections.

Textured Ceiling

OK, let’s talk about this room. 1. The ceiling is beautifully white, right? And isn’t the texture awesome?! I really like this kind of ceiling versus the popcorn ceilings. I’m not a fan of those. 2. Look at that fireplace. It is gorgeous. And, my MIL just had a gas fireplace retrofit into her existing fireplace that is absolutely stunning. I have fireplace envy. I wish we could flip ours on with a switch, especially since our family room is so darn chilly.

We’re going to help paint the walls soon, too. This room is going to be so pretty when it is finished! BTW — it used to be covered in dark paneling! You’d never know.

To round out this completely all-over-the-place post, I wanted to update you on the earrings post I did on Friday. I am totally ecstatic about making my own stud earrings now — I should have made them forever ago!

Anyway, I wanted to show you all another fun way to make these button stud earrings. As I was making a bunch of new pairs this weekend, I found that you can take  buttons with the attachment on the back (I swear I used to know the name of these) and use it with a button with holes to make a combo button earring.

Find two sets of buttons you’d like to combine…

Button earrings

… then cut the loop off the back of the button that will go on top.

Button earrings

Put some E6000 onto the button on top, then line up the two prongs of the top button with the holes in the lower button. Then, press them together and let the glue harden.

Button earrings

Attach a stud with the same glue and let it dry overnight.

Button earrings

OHMYGOSH Are these cute or what!? I made them for my friend Amy. Love love love them.

Button earrings

I also made a set of sister earrings 🙂 Mine are on the left, Em’s are in the middle, and Allie’s are on the right. So cute!

Button earrings

I’ll post pictures from the parade tomorrow!!!!