Craft Projects

DIY Button Tray


IMG_0160

Need a fun project for the upcoming weekend? Why not try making your own button tray?!

This tray takes a while, but the end result is totally worth it.

Supplies:

Step one: Prepare your tray for painting by doing a light sanding (if necessary).

Plain tray

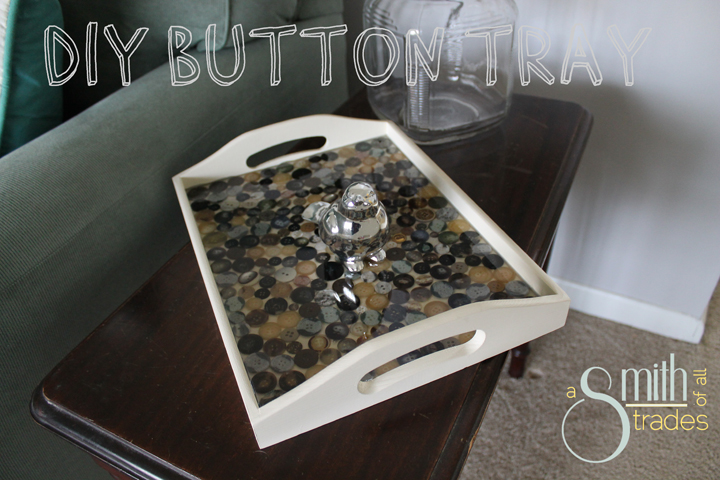
Step two: Apply several coats of paint to your tray, allowing adequate dry time in between coats. I opted for an off-white color for my tray.

Step three: Once your tray is dry, start securing buttons to the bottom using glue. I used super glue until I ran out of it and switched to hot glue. Glue your buttons as close to one another as possible. Do not skip the gluing step because the buttons will rise when you pour on your super glaze.

Button Tray

Button TrayStep four: When all of your buttons are secure and the entire tray is filled, it is time for your super glaze. I buy mine from Home Depot. Mix up your super glaze according to the directions pon the box (1:1), then pour over the buttons. To get the best results, I poured my first layer and let it dry for the recommended 72 hours. Then I came back and poured a second layer to fill in any nook, crannies and buttonholes.

Step five: This is the hardest part — let your tray dry for the full 72 hours. I had to wait twice since I did mine in two layers! If you don’t, you will get fingerprints on the clear finish and it might be tacky. Also, let the tray dry in the warmest room in your house. I let mine dry in our office — the hubby’s computer makes it super warm. When I let it dry in our cool basement, the finish on the super glaze was tacky to the touch. Always place cardboard underneath in case anything leaks out (which is did because my tray cost $.50 and wasn’t the greatest work of construction known to man).

IMG_0151

Step six: Admire your hard wok and patience by displaying your beautiful tray proudly in your home.

IMG_0152

Button Tray square


Quick and Easy Crafts

Marble Lamp

Mason Jar Marble Lamp

Remember those marbles I talked about yesterday? The one catch to me making John a marble tray was that I not use all of the marbles in case he ever wanted to play with them again. My solution to this was to make him a lamp out of a mason jar to display his marbles in a way that he could still get access to them if he wanted to.

This was really simple — Amazon sells kits for turning mason jars into lamps. So, I popped the top off of the jar, filled it with marbles, screwed on the kit and a put a light bulb in the lamp. Easy as pie.

The tricky part? Finding a darn lampshade that didn’t look ridiculous on the lamp. I think I tried five of them. I tried a shade from le Target — way too big. I tried three different shades from Home Depot… way too small. The one in the photo used to be pink with flowers. Not too manly. Then I spray painted it ivory. That didn’t look so hot either. As a final attempt to use this shade, which was the best size and shape of any of the ones I tried, I painted it grayish blue and accented with silver paint.

Phew, this was way trickier of a project than I ever intended because of that darn shade.

IMG_2422

It was all worth it because he really liked the lamp. It looks great in their antique room, too.

IMG_2455

Have you ever turned something into a lamp? Next time I want to try it without using a pre-fab kit. What would you ill your mason jar with? I think shells would be neat, but our house isn’t too beachy. Still would be pretty though!

Craft Projects

Marble Tray

Marble Tray

Months ago I was at my momma’s house and we stumbled upon a huge jar of marbles that used to be my step dad’s. I knew he loved the marbles, but I didn’t know why he was keeping them in the closet and not out somewhere in the house so people could see how cool they are. I asked if I could take them to make them into something cool, which is what I did for his Christmas gift.

Enter the Christmas tray from the thrift store. This bad boy was uglyyyyyy. So ugly. But, it was the perfect size to make a cool tray for John.

IMG_1313

I took the tray outside and spray painted it black.

IMG_1315

When it was all dry I filled the bottom of the tray with marbles and started to prepare the epoxy resin  to fill in the tray.

IMG_1320

For this tray I used Parks Super Glaze.

IMG_1318

To use the epoxy you mix equal parts of the hardener and the epoxy together. I like to mix mine in disposable cups so I can just toss them when I am finished. Mix everything together really well then pour it onto your project. It will level itself out, so just make sure you place it on a level surface.

IMG_1319

Here’s the tricky part — you have to let it sit in a dust-free zone for three whole days. Rough, I know. You also need to keep your project in a warm area. The epoxy will not cure if it dries in the cold. I learned this the hard way.

And because I learned it the hard way, there was one tricky spot on my tray I couldn’t get to cure. So I solved the problem by painting a label onto the tray in chalkboard paint so I could write “John’s marbles” on it. I accented with gold paint and the tray was complete.

My parents have an antique room in their house, so that’s where John put it after I gave it to him on Christmas.

IMG_2456

This project was long in the works, but I know my step dad really loved it.

I love using the epoxy and am definitely learning new stuff each time I use it. It is such a cool finish on projects and I will definitely be using it again in the future.

IMG_2458