Craft Projects

Bride and Groom figurines

OK, OK, OK…. I promise after today I will stop talking about wedding stuff and Chicago. But give me one more day. You won’t regret it.

First of all, if you want to see some of the most amazing wedding pictures EVER, check out the professional photos from Allie and Stanton’s wedding. Holy amazing.

If you want to see the most amazing wedding craft ever, keep reading 🙂

I wanted to make my sister something for her wedding and was totally inspired to make her bride and groom figurines after trolling craftgawker one day.  I saw these adorable wedding cake toppers on Crafts Unleashed, and although they did s’mores and no cake, I knew I had to make them.

To make these figurines you need to buy little wooden body forms at a craft store.

IMG_4010

Hobby Lobby only had men figures, so I just used that and they turned out great. Take your time and carefully paint each figurine. Seriously, this takes so much patience. And a tiny paint brush. But mostly patience.

I painted the dress and white part of the tux first, then layered on the darker colors. I did the hair last so I could continuously grab the little head to paint the body. I let the body dry before moving onto the hair.

Wedding people

When I was done painting everything, which took a couple of hours, I added a veil using leftover tulle from my neighbor’s wedding veil.

Wedding people 2

A small dab of hot glue and some careful placement — my bride doll had a veil!

Wedding people 3

I ended up giving these to Allie early, so she put them at her and Stan’s spot at their wedding 🙂

Wedding people 4

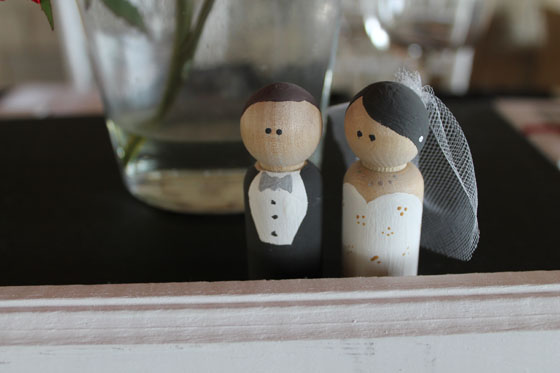
So stinking cute 🙂  I wish I had made a set for the hubby and I for our wedding.


Craft Projects

Knockoff: DIY Herringbone Art

I stumbled upon a fabulous blog the other day that you all should DEFINITELY check out. Sarah at While They Snooze is incredibly talented and just recently competed in Creating with the Stars over at East Coast Creative. I was perusing her blog and saw the most magnificent artwork that I wanted so badly for our house. SO BADLY!!!

Here’s one of those times when beautiful things should be admired and not replicated. They never turn out how you want them to. Following her lovely tutorial for her DIY Metallic Herringbone Art, I created my less-than-adequate version of her masterpiece.

Instead of telling you what I did, you can scroll through the photos below of the steps I took. But what you should really do is go and check out Sarah’s art. Because it is amazing. And yeah, you have to click over. I don’t like borrowing photos. Trust me, it’s worth your time.

{A Smith of All Trades} Herringbone Art1

{A Smith of All Trades} Herringbone Art2

{A Smith of All Trades} Herringbone Art3

{A Smith of All Trades} Herringbone Art4

{A Smith of All Trades} Herringbone Art5

{A Smith of All Trades} Herringbone Art6

{A Smith of All Trades} Herringbone Art7

{A Smith of All Trades} Herringbone Art8

Now that you see my finished piece… what do you think? I wish I had had gold spray paint on hand. I just might try this one more time, even though it took a while. I just love her finished piece and have TOTAL art envy.

Craft Projects, Jewelry, Quick and Easy Crafts

Gunmetal and mint necklace

How was everyone’s Easter? My weekend was filled with three different dinners, a birthday brunch and simply way too much delicious food. Basically, it was awesome. My older sister came into town, and it was the first Easter and birthday we’ve celebrated with her in a decade (or so it seems). My mom, little sister and I took her to brunch in Baltimore at Cafe Hon to celebrate her birthday. It was a ton of fun.

{A Smith of All Trades} Easter Pic

Sunday was dinner at my dad’s house with my stepmom’s family and her brother’s partner’s family. I’ll give you a second to figure out that relationship 🙂 We only get to see them at Easter, which makes the holiday even more enjoyable.

My Easter craft was pretty simple, and I’m only just sharing it now because the weekend was SO busy and yesterday I had a killer headache. I even missed trivia, so you know it was crummy.

Anywho… I needed a new necklace for Easter. Yes, needed.

I had this old chain that I’d been hanging onto. I liked its chunkiness, but the length was awkward. You know what I mean…. long enough to occasionally disappear  under your shirt and just the right length to get stuck in cleavage… basically, the worst length for a necklace!

{A Smith of All Trades} Gunmental and Mint Necklace1

I cut the necklace in half using really strong pliers, then added a new section to the necklace of bright mint beads.

The beads were a gift from my bestie, and were a totally sweet thrift store find. To add them to the chain, I used beading wire and a crimp bead. I looped one end of wire around the end of the chain, then flattened and crimped the crimp bead so no beads would fall off.

{A Smith of All Trades} Gunmental and Mint Necklace2

Then, I strung the beads with gunmetal spacers in between, closing the wire at the other end with a crimp bead.

In about four minutes, my boring, awkward-lengthed necklace was transformed into the perfect necklace. My sister really liked the whole thing hanging asymmetrically, too.

{A Smith of All Trades} Gunmental and Mint Necklace

AND, it is also the perfect length to wrap around my wrist to become a chunky bracelet. #Winning.

{A Smith of All Trades} Gunmental and Mint Necklace3

I hope you all had a great Easter. The weather is finally getting warmer in Maryland, so hopefully I can start to tackle a few larger projects I’ve been wanting to do.

Oh, and our doors are supposedly in! Joyyyyyyyy 🙂 I’ll make sure to show you when they are all installed and beautiful!