Furniture

Gray painted dresser

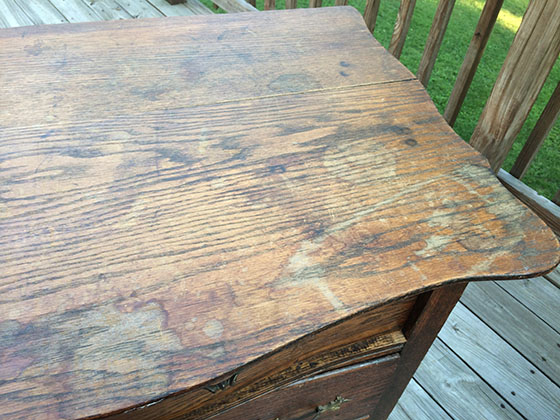
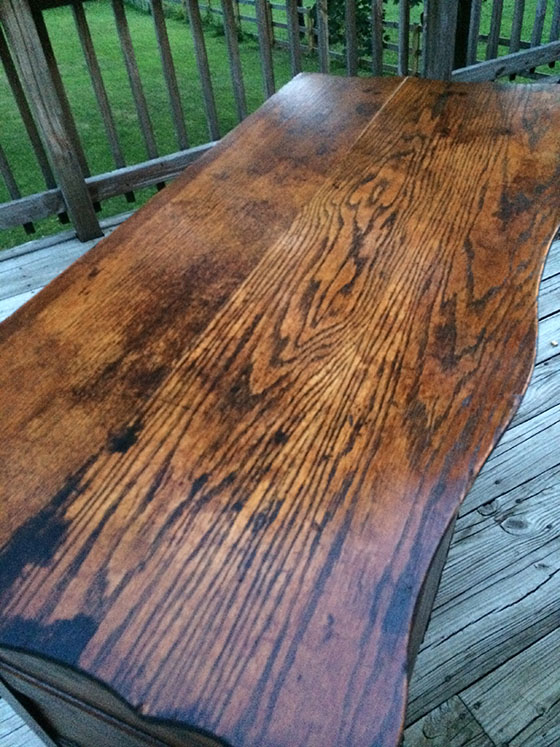
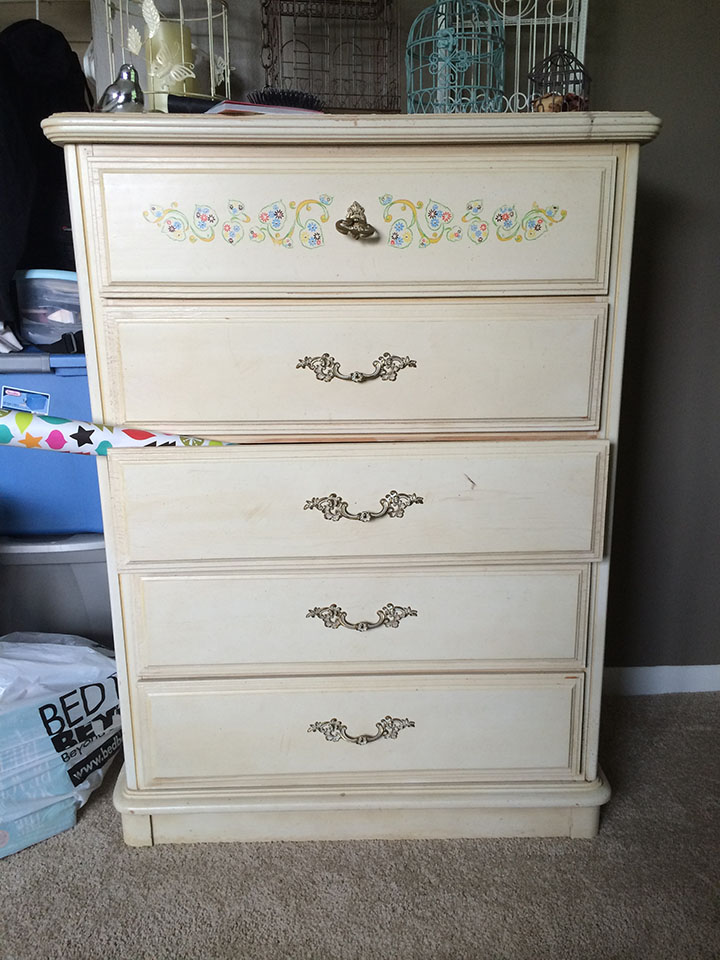
I have a (bad) habit of taking any and all furniture that people don’t want. So when my mom and stepdad cleared out their laundry room to make way for some nicer storage, I happily took the dresser they’d been using for years downstairs.

Our family friend painted this for my older sister — in fact, she had a whole matching set at one point! I kept it as is for a while, knowing at some point I’d want to update it.

Painted Dresser_BeforeTo update this dresser, I opted for paint. Since it was already painted — and rather nicely, too — I didn’t want to go through the hassle of stripping and sanding it down.

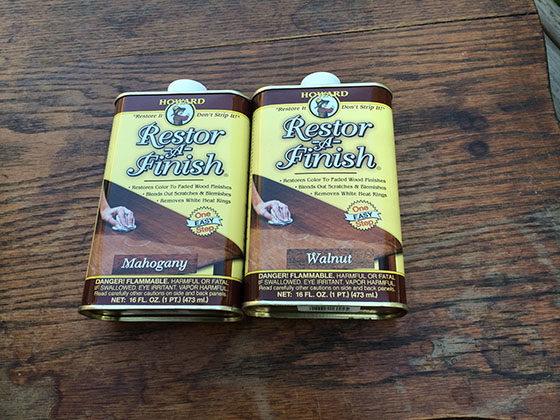
I splurged on paint, buying Satin Impervo Benjamin Moore paint, which is made for kitchen cabinets. It’s an oil-based paint that cures, not dries.

Painted Dresser_Satin Ipervo

And you know what else? It is stinkyyyyy. Holy smokes, is it stinky.

Painted Dresser_Mask

I wore this bad boy the whole time I used it, which I should be doing anyway when I paint… but it was way necessary this time.

Before I could start painting, I sanded the whole dresser down.

Painted Dresser_Sanded Drawers

Then, I filled the wholes and sanded down again. This ended up being an unnecessary step because I ended up using the holes anyway. Oh well!

With everything sanded, I started to paint.

Painted Dresser_Drawers

I let the paint dry for days (I think 4) before doing a second coat. I was worried because the paint seemed to be tacky for the longest time, but the more I researched I learned that the paint cures, not dries (I know I said this earlier). That’s really important though, because you can’t add your second coat until the first cures completely.

When the first coat cured, I added a second. And then I let that cure, too.

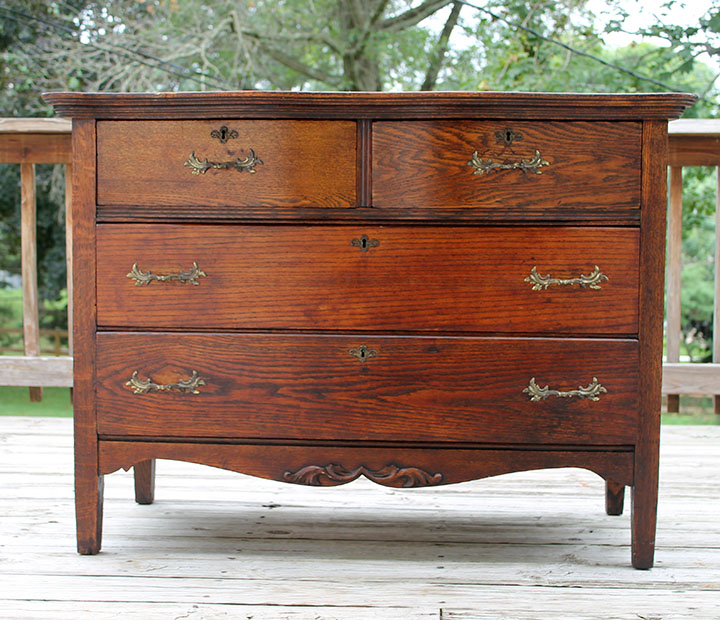
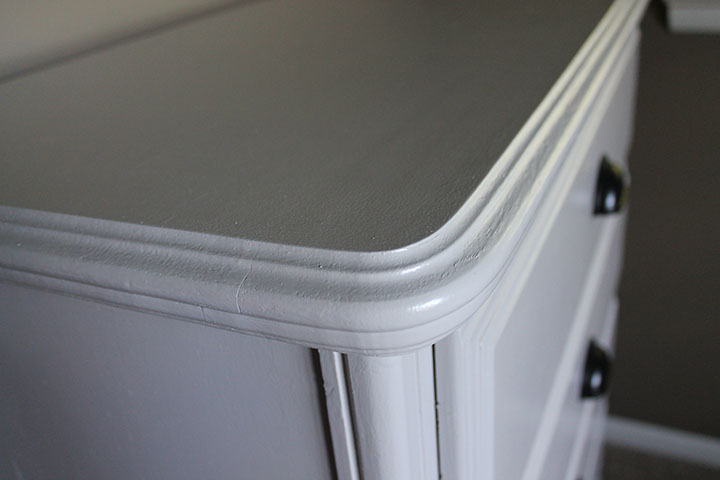
When everything was dried and hard to the touch, I added back the hardware. I chose black cup pulls and IĀ love them. Seriously, they are fabulous.

Painted Dresser_Finished Product

The cup handles are fabulous, the paint is fabulous. I mean, just look at the top and how smooth it is!

Painted Dresser_Angled

The paint, while expensive ($25/quart), was worth it in the end. Much better than anything else I’ve used. We’ll see how it holds up over time, but at least right now I am so super pleased with how it turned out.

Quite a difference from before, huh?

BEFORE:

Painted Dresser_Before

AFTER:

Painted Dresser_Final

On an unrelated note, happy birthday to my neighbor Allie and her twin Shelly šŸ™‚

Furniture

Crate Coffee Table, part 2

Earlier this year I found a crate on my local Freecycle listservĀ that I scooped up, added some caster to and turned into a coffee table.

Crate Coffee Table

The crate sat as is for a while, but the wood was rough around the edges and the crate had been written on and scuffed up. I decided to take on the coffee table crate project for a second time, this time opting to stain the crate and make the piece a little more polished — well, as polished as an old wood crate can look.

The side of the crate was painted a dark, charcoal gray. I decided to stain the crate a gray to pull out the charcoal-colored sides.

Before I could start staining, I had to sand the hell outta the crate. The top was covered in nicks, scuffs, sharpie, old sticker goo…. It wasn’t pretty.

Crate

It looked like someone had kept score on the crate, or attempted math? Who knows. But the sharpie had to go.

CrateTop

Once the whole crate was sanded down, I applied a gray stain to the whole thing, including the painted sides. Since some of the paint was scuffed off, I wanted to make sure the exposed wood was gray, too.

CrateStained

The wood soaked up the stain lie crazy, turning the whole crate a charcoal gray with wood grain popping through. I love the color mixed with the natural wood peeping through.

Once it dried, I coated the whole thing in a polyurethane.

CrateGray

The finished product is still a roughed up, old crate — but a much nicer looking old crate. I like the gray a lot and how it tied the sides and the rest of the piece together. I also like the lack of graffiti on my furniture. That’s a plus for sure.

Crate iside

We aren’t currently using the crate as a coffee table, so I’m not sure what we’ll do with it. But I really like the cleaned up look for this neat old piece.

Furniture

Revamped antique dresser

I grew up with this antique dresser always somewhere in my house. Ever have an affinity for something just because you grew up with it? Well, that’s how I feel about this dresser. It’s not quite my style, but I love it nonetheless. With four drawers, each with their own keyhole, and a beautiful curve — this pieceĀ is exactly what comes to my mind when I think of an antique dresser. My dresser comes with an added bonus — a small teal bead that me and my sisters stuck in one of the keyholes. We could easily remove the bead, but it has become sort of sentimental through the year — like, oh, is that the dresser with the bead stuck in it?

Antique Dresser_Before

Anyway, long story short, my mom and step dad had the dresser at their hose for years. Over the years, it somehow made its way into the garage and became a storage chest for nails, screws and the like. Needless to say, it got a little bit beat up.

Antique Dresser_Before_Top

The top really needed some love. With a crack 1/3 the way through it and all sorts of nastiness to the finish, it was crying for some help.

But let’s rewind….

Before I could tackle any of this, I had to clean this puppy up.

Dresser SPiders

Talk about some serious spider webs.

OK, back to the restoration.

Restor-A-Finish

I pulled out my walnut restor-a-finish and a new bottle of mahogany finish and mixed the two together. The dresser was an in-between color, so I figured a mix would be the best option.

Before I started the application of the restor-a-finish, I first wiped down the whole dresser, removed the drawers and took off the hardware.

You can really see the color variation in the finish in this next picture, especially underneath where the hardware goes. You might also notice some doggy paws keeping me company.

Drawers_no hardware

I also filled the crack in the top of the dresser using Elmer’s wood filler.

Filling crack

Once that dried, I sanded it smooth.

Then, I got to restoring. Using gloves and a ventilator mask for safety, I started applying the restor-a-finish to the whole dresser. All you have to do is put it on with a paper towel and let it soak in. In 20 minutes, wipe the finish back off. I did this twice, although that probably isn’t necessary. When that wasĀ dry, I simply added some feed-n-wax to the piece. You use the same method for the wax — wipe it on with a paper towel, then in 20 minutes remove it again.

And that’s it! I reattached the hardware and put the drawers back in.

Antique Dresser_Top_After

Check out that top! All sorts of fancy and nice.

Top

Here’s another shot. You can see there are still scratches in the top, but they don’t stand out anymore because of the treatment done. If you wanted the scratches out completely, you’d have to sand down the stop, which would remove the original finish of the piece. It’s a toss-up. The scratches don’t bother me, so I opted to let them stay with the original finish of the piece.

Ready for the whole thing?

BEFORE:

Antique Dresser_Before

AFTER:

Dresser After 2

It has such a nice color to it again!

This dresser is a perfect example of notĀ needing to paint old furniture. Don’t get me wrong — I love a painted piece of furniture, but I hate to see beautiful antiques covered with paint because people aren’t aware of their other options!

Dresser After

My mom and stepdad will be sad they let it go. Now I need to figure out where it will live in my house. I am thinking it will go in our guest room and that we could use it as a future changing table for future babies. That seems to be a popular trend these days, anyway. Wouldn’t this be adorable in a little girl’s room? Of course it would, that’s why my mom got it for her three daughters šŸ™‚

BONUS:

I don’t usually share outtakes from my projects and photo shoots, but Remmy was all over me for this project. I guess when his momma is outside, he’s gonna be glued to her side.

Remmy in project
Here he is in his cone of shame. Don’t worry, he’s OK. He just irritated his paw and wouldn’t leave it alone.
Rem2
Don’t worry, Rem. I wanted to take your picture, not one of the dresser.
Rem1
Staring contest. I won, he got bored.
Rem3
Oh, were you trying to take a picture? My bad…