Christmas, Craft Projects, DIY GIFT GUIDE, Gift Idea, Holiday

DIY GIFT GUIDE: Snowman Ornament

DIY GIFT GUIDE Snowman Ornament

Day 4 of the DIY GIFT GUIDE series brings us this adorable snowman ornament. If this guy doesn’t belong on your Christmas tree, I don’t know what does.

Supplies:

Styrofoam Balls

  • Styrofoam balls in three varying sizes
  • Craft Wire
  • 2 black beads
  • Silver tacks
  • Ribbon
  • No-Fray
  • 1 button (white)
  • Hot Glue

Steps:

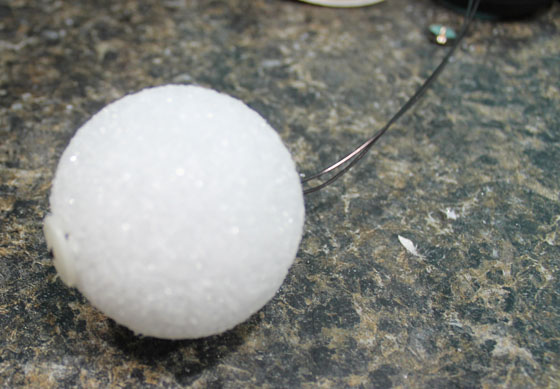
  1. Cut a long piece of wire and bend it in half. Feed it through two holes of a white button. This will secure the styrofoam balls to the wire.Button through Wire
  2. Feed the wire through the largest of the three foam balls. Try to get the wire to go straight through the middle so the snowman isn’t off kilter.Ball on wire
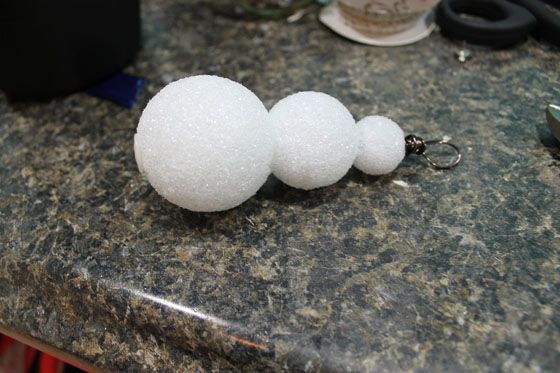
  3. Stack the remaining two balls on top of the first with the medium ball next and the smallest ball on top. In between each ball, place a small bit of hot glue on the wire to keep the ball secure once it is in place.
  4. When the snowballs are assembled, secure them at the top by making a wire loop, then wrapping the remaining wire around the base of the loop. Add a thin ribbon here to hang the ornament.Snowman assembly
  5. Next, create the snowman’s face by firmly pushing two black beads into the styrofoam for the eyes. I used faceted beads, not round beads, thinking they’d stay in better.
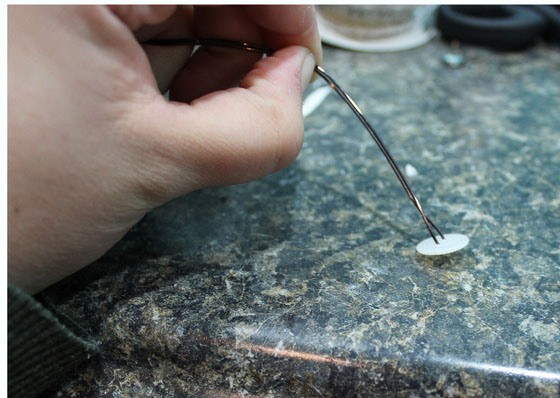
  6. For the mouth, take a small pice of craft wire and bend it into a smile. Then, form 90 degree bends at the end of the smile and push it into the styrofoam.
  7. For the buttons, take silver tacks and stick them into the styrofoam to act as buttons. Place a dab of hot glue under each one so they don’t loosen and fall out over time.
  8. The scarf is next. Find a thick piece of ribbon and tie it around the snowman’s neck. Then, take scissors and “fray” the end of the scarf by cutting small slits. Use no-fray to seal the ends so the ribbon doesn’t unravel.
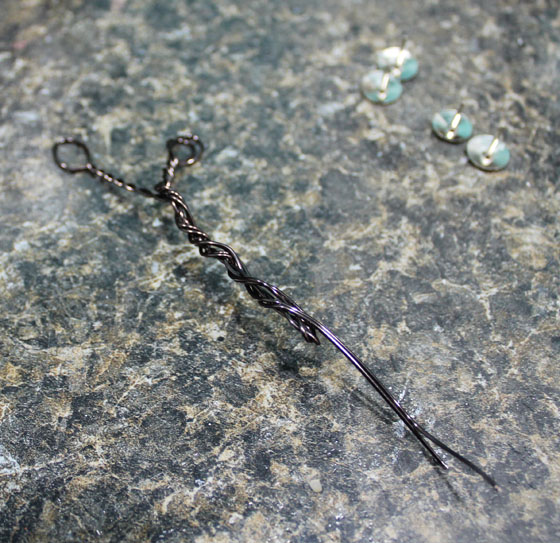
  9. Take a long piece of wire (12″) and fold the wire in half. Twist the wire until it is 1/3 of the way twisted. Then, take the straight wire and wrap up the twisted portion. When the wire reaches an inch from the top, start twisting again. This will form the two forks in the arm. When both forks are twisted, wrap the remaining wire down the base of the arm, then stick the wire bottom into the styrofoam. Secure with glue and repeat.Wire arm
  10. Hang snowman ornament on tree!

Snowman ornament

Snowman

Check back tomorrow for another DIY GIFT GUIDE post! Hope you are getting some good holiday gift inspiration.

Recipes

Homemade Blackberry Jam

Blackberry Jam

Yup, a third recipe. Don’t worry — back to crafts after this. I couldn’t help it though 🙂 I never ever bake or cook exciting things, so when I do I feel compelled to share. Remember Mean Girls and “word vomit“? It’s like that. … it’s blog vomit. Weird, but it sorta works.

Moving on… After you are done making your amazing strawberry jam, try your hand at making some blackberry jam. I was in Costco and saw a huge thing of blackberries and had to buy them to make some jam for my momma. I know she loves her some blackberry jam.

This recipe is fairly similar to the strawberry one. Here goes.

I filled a quart-sized baggie with blackberries and smashed the heck out of them. I didn’t want to chop them up, and they are soft enough that squishing does the trick.

Looks yummy already, huh?

Blackberries

I poured my blackberries into my jam maker, adding a tablespoon of butter and 1.5 tablespoons of pectin.

After four minutes, I added the sugar. I added 1 1/3 cups to this batch. Blackberries aren’t always as sweet as I’d like, so I added more to this jam than I did to the strawberry jam.

Let the jelly maker do its job (remember, this can be done on the stove, too!) and can immediately after the jam is done.

If you plan on eating some right away, put it in the fridge. Once it is cool, slather it on some toast an enjoy.

Blackberry Jam on Toast

Recipes

Homemade Strawberry Jam

Homemade Strawberry Jam

I got the most random appliance for Christmas (I asked for it, btw) — a jelly and jam maker! I absolutely love making homemade jams and jellies and thought I’d share a recipe or two with you guys.

Today I made strawberry jam. It’s the hubby’s favorite and it is so soooo delicious. I like making my own because I don’t have to put nearly as much sugar in it as the store-bought jellies. Plus, it is tastier.

Here’s what you need (yes, real measurements! I know, that’s crazy coming from me.):

  • 2 lbs Strawberries
  • 1 tbsp butter
  • 1.5 tbsp pectin
  • 3/4 cup sugar

Before I start I should add that this recipe will work on the stove as well. The jam maker is preset to make jam or jelly and has a stirrer in the middle so nothing burns. It’s just a glorified pot. (But it is awesome!)

First, cut up your strawberries into little bits. If you like your jam chunkier, leave some bigger chunks of the fruit.

Next, mash your berries with a potato masher to get some of the juices loose and the strawberries extra squishy.

IMG_0062

Add your strawberries, butter and pectin to your jam maker and turn it on. In my jam maker, the preset time for jam is 21 minutes. If you make it on the stove, cook on medium heat for about the same amount of time.

Side note: I had no idea what pectin was before I started experimenting with my jam maker, so here’s what I’ve learned. Pectin is a natural substance found in apples that helps fruit to gel up. For fruits with a lot of pectin in them, you do not have to add pectin to make the jam or jelly (although it doesn’t hurt). Berries don’t have a lot of pectin, so you need the added stuff. I buy mine on Amazon.

After 4 minutes, add in your sugar. Cover and walk away and let the pot do its work.

Jam

Come back in 21 minutes to a steamy pot full of delicious jam. If you want to can your jam, do it immediately while the jam is still boiling hot and you won’t have to boil your jars to seal them. Simply place your seal and your lid onto the can after it is full, then flip it upside down. The heat from the jar’s contents will seal the jar and make it last for about a year.

The jam will also burn badly if you spill it on yourself. I learned this the hard way after spilling a bunch of boiling peach jam on my hand. Be careful!!!

If you are going to use some right away, plop it into a container and place it in the fridge. Once it is cool, try it out!

jam on toast

(Don’t just my white bread. … It’s what the hubby likes and mine was out :p)

The main reason I am sharing this recipe is that when I got my jelly and jam maker it came with a recipe book. This recipe book called for a ton more pectin (which is expensive) and a TON more sugar. I’m talking three cups. Gross. I think the recipe I have here is a really good one that I plan to use from now on with this jam.

Enjoy!